Monday, April 30, 2012

Get Off the Couch! Let's get that laundry done!

Do any of you get sucked into blogging? I really try to keep balance and not spend too much of my day blogging. I got a laptop for Christmas. It's easier to forget how long I've been on the computer now that I'm sitting comfortably on the couch instead of on a hard kitchen chair.

Meanwhile the laundry is piling up. I am very good about getting it all washed and dried, it's the folding and putting away that gets left undone.  

Here's my system for the washing: 
Saturday - the kids sort their laundry, and I sort mine and my husbands.

I bought this little cart at Walmart for around $13. It's the best purchase I've ever made. The kids can sort their own laundry, and it fits into the small space I have in the laundry room. I keep a laundry basket on the floor for towels.
{you know we must be friends now, if I'm showing you my laundry room}

I also keep this basket on the dryer for whites. There's also a shoe box full of socks without matches.  And don't ask me how I washed a sponge brush, but I did and have yet to put it away.
Not the prettiest laundry room {one of these days I'll get it decorated}, but it's functional.

Mondays: wash towels {usually two loads}
Tuesdays: wash whites {one load}
Wednesdays: wash light colors {two loads}
Thursdays: wash darks {1-2 loads}
Fridays: wash jeans {1-2 loads}
A lot of times I wash jeans on Thursdays just so I'm done early for the week.

I love that everything is sorted and I can just throw in a load first thing in the morning.

Now comes my problem.
It is common to see at least two {usually more} baskets of laundry in the living room waiting to be folded. 

It's been especially bad lately since I've been spending so much time finishing up our basement. Now that the carpet is installed and there are only a few minor things left to do down there, I decided Enough is Enough! No more laundry sitting around for days waiting to be folded.

So I decided to find out how long it really took to fold a basket of laundry.  
 I  started with the hardest to fold at our house - the kids cloths {see above}. Most of the girls clothes are light in color and are washed all at the same time.  

I got out my timer {I know, kinda nerdy} and got to work.

The first basket I folded in under 4 minutes! {there was more adult clothing so it went super fast} The second basket I folded in 6 minutes.
I always set aside the socks until the end so it took another 2 minutes to match them up.
Then to put everything away it took just under 6 minutes. 

This was my total time {17 min 49 sec} for TWO baskets from the time I started folding to the time I put the empty baskets back in the laundry room.  So I figure even the hardest baskets to fold should take less than 10 minutes.

I also timed myself folding a basket of towels. Get ready for this.... The time it took me to fold and put away a basket of towels was 4 minutes 31 seconds. I imagine jeans would be just as fast.

Why in the world do I let them sit and sit? It really doesn't take that long to fold them and put them away.

My goal is to get each days laundry folded THAT day. I've done really well for the last week. It's so much easier when there's not as much to fold at one time too. 

So was this motivating? What are your tips to getting your laundry done? Do you involve your kids? I'd love to hear your thoughts.


Friday, April 27, 2012

Strawberry Freezer Jam

Today I'm showing you how I make freezer jam. My favorite is strawberry and right now is the best time of year to get strawberries for a good price. 


This is the easiest jam you'll ever make and it's my favorite jam to eat. 

I used two different freezer jam pectins. The one on the left you add sugar too and the one on the right has the sugar included.  I can't really tell the difference. I had the one on hand and the other was what the store had. There is a price difference, but if you figure that you don't have to add the sugar, then it probably evens out. 

I'm not sure that a tutorial is really necessary since it's so easy and the instructions are on the back of the pectin package. But I'll do one anyway.

First step, wash the berries and cut off the stems and any bruises.


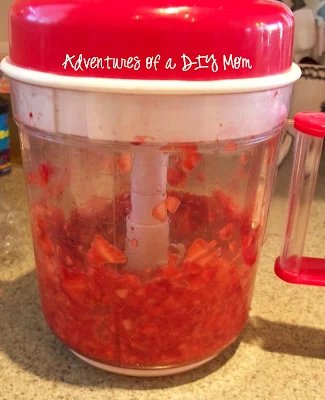
Next chop them up. I'm not sure what this tool is called. My mother-in-law got it at a yard sale, but it works perfectly for this. It chops the berries up super fine without pureeing them like a blender would.


Mix in the pectin {make sure to follow the instructions on the package, you may need to mix the sugar into the pectin first}

Then stir it very well and pour into freezer containers. I've know people who use canning jars. You can  use anything you have. Over the years I've purchased enough of these containers made especially for freezer jam. It's definitely not necessary though. Use what you have.


Enjoy right away or freeze. It should last up to a year in the freezer.

 I made four batches, it should last us through the year. 


Thursday, April 26, 2012

Spring Flowers

We've been spending lots of time outside lately, so I thought I'd share some of our spring flowers. 

After 10 years our yard is finally coming together. We still have a few problem areas and a few things I'd like to add.  We started small and each year added a few new plants or trees.

These dianthus are new this year. I got one from my daughter for mothers day years ago. Even though it's supposed to be an annual, it keeps coming back and getting bushier with more blooms. I'm hoping these ones will too. 


Last year we got this creeping phlox. We bought ten small plants and they have just spread out and are so pretty. I'm waiting for them to go on sale again. I want 15-20 more. 

This is one of my cherry bushes. They started out in 4" pots. I think we've had them 4-5 years now. It produced a sour cherry. {for pie making}

We got 4 fruit trees last spring. I've been wanting fruit trees forEVER.  This one is our apple tree.

This one is our peach tree. We didn't know if this one would make it, since the dog chewed it up pretty good last fall. But it seems to be doing great.

This is one of our two bing cherry trees. {See that little bee doing his job}

These tulips are one of the first things we got for our yard. One side of our walkway has tons of them. I'm not sure what happened but the other side has only a few. Every spring I think I need to plant more this fall, and every year I either forget or am too lazy when fall comes around. 

I saw some potted ones at the store, has anyone ever planted them from plants as opposed to bulbs? Do they take? 

This is probably my favorite! I absolutely love lilacs. They are so fragrant and so pretty. I've had this bush for 8 years now. It was one of the first things I planted in our yard.  I have a picture of my oldest daughter who was not quite 2 and she was bigger than the bush. It's huge now. The only problem is that it is on the side of the house where I don't go very much, so I don't enjoy it as much as I should. 

We also have raspberry and strawberry plants, as well as our garden boxes. Maybe after I get those weeded, I'll share them too. We also have four HUGE ponderosa pine trees in our front yard. I still can't believe how big they've gotten.


Wednesday, April 25, 2012

The Power of Spray Paint

I'm so excited that it's yard sale season again.

Since our basement is all but finished now, I have several things I'd like to find at yard sales this year.  

Saturday I found this cute little bed. It came with the mattress and a mini box spring too. My son's bed had a metal frame and with time {and I'm sure jumping too} the metal bars were all bowed. We really needed a mattress for our littlest one too, so when they said $10 for it all I was sold. 

 I really didn't mind the color. It just would not go with my sons room. 

Thanks to my husband for spray painting it.  He used Rustoleum Satin Black.


I should have taken a picture before the mattress was on it, since it's hard to see. 

So yesterday we played musical beds.  We took down my son's old bed. Put this one up.

Then we took apart the bunk bed and took one bed downstairs for my 4 year old. 

Then I took apart the toddler bed that she slept on a few nights since she could not wait to sleep in her new room downstairs.

I also bought a dresser this weekend too. More to come about that when I
repaint it. 


Tuesday, April 24, 2012

Terrific Tuesday #12


We had some terrific links this week! Thank you again for linking up each week!

The most viewed link:
DIY Book Cover by The Mulberry Tree


 Some of my other favorites were:

T-Shirt Flower Tutorial by Aprons & Ambition
This flower is not only pretty, you probably have all the supplies already around the house.Go check out the full tutorial.

Stamped Burlap Art by Home Happy Home
I love the look of burlap. I wouldn't have thought to stamp it, but it turned out so cute!

Lemon Cream Crumb Bars by Dessert Now, Dinner Later
This looks amazing! I love lemon desserts and I'll be trying this for sure this summer.

Go see what else I featured over on my Facebook page.


Here's what I've been blogging about the last week:

Now let's see all the terrific things you've been up to.

Here are my guidelines:
1. Link up any projects, crafts, or recipes you have blogged about recently. You can definitely link up several projects. No shops or link parties please.


2. Comment, comment, comment.  My vision for this link party is not to link and go. Please comment on two other links.

3. I'd love for you to follow my blog. Also if you're so inclined, you can follow me on facebook and pinterest as well.

4. Display my button somewhere on your blog - in the post, the sidebar, or on a party page.


Friday, April 20, 2012

Cake Batter Muddy Buddies

So last month my family had a little get together. I had seen cake batter muddy buddies floating around. I have not made anything cake batter flavored before, but it sounded good. I decided to make regular Muddy Buddies and Cake Batter Muddy Buddies {my daughter decided to call them Snow Buddies}


I'll be honest when I first tasted the Snow Buddies I didn't like them. I tried them immediately after making them and it seemed like there was too much cake mix powder. HOWEVER, the next day when I pulled them out to share with the family I could not stop eating them. The cake mix flavor had blended in with the white chocolate and was no longer overpowering. 

So which did we like better?

Personally I could not decide. Whichever one I was eating at the moment was the one I liked best. 

Overall though, I think most of my family liked the Snow Buddies.

Another plus of the Snow Buddies is there is no peanut butter, so my oldest can eat them. And she loved them. 


Have you made either of these before? Which did you like better? 


Cake Batter Muddy Buddies

Cake Batter Muddy Buddies

Yield: 10
Author:
prep time: 15 Mcook time: total time: 15 M
A delicious twist on the muddy buddy with cake batter flavor.

ingredients:

  • 5 c. Chex
  • 10 oz white chocolate
  • 1 1/2 c. yellow cake mix
  • 1/2 c. powdered sugar

instructions:

How to cook Cake Batter Muddy Buddies

  1. Melt the chocolate for 1 -2 minutes, stirring every 30 seconds until melted.
  2. Pour over chex cereal.
  3. Place cake mix and powdered sugar in a zip top bag. Pour in chex mixture. 
  4. Shake until evenly coated.
Calories
243.17
Fat (grams)
9.73
Sat. Fat (grams)
5.80
Carbs (grams)
37.44
Fiber (grams)
0.27
Net carbs
37.16
Sugar (grams)
30.27
Protein (grams)
2.33
Sodium (milligrams)
157.22
Cholesterol (grams)
5.95
Nutritional information is automatically generated and is not guaranteed to be correct.
cake batter muddy buddies, cake batter chex mix
Desserts
American
Created using The Recipes Generator

Thursday, April 19, 2012

DIY Spice Rack

So a few weeks ago I did a guest post over at Mom on Timeout

Today I'm going to share it with you.

 I'm going to show you how I made a new spice rack for my kitchen. 


I started out with some scraps from the basement. I used firring strips cut to the following lengths:
2 pieces - 12" long
2 pieces - 8 3/4" long


The using a brad nailer, I nailed them together like this. The 12" pieces should be your top and bottom.


Next measure across for the middle to get an exact measurement for your shelf.
Cut your middle shelf. Mine was 10 1/2". Then nail into place.


Now it's time to fill the nail holes with wood filler. Since I'm painting it, I just used white that we had. 


Give it a good sanding and then prime and paint. I used Krylon Ivory in gloss.


Now for the fun part - adding the cute bottles.

Using my Silhouette, I cut little labels for the tops of the jars. I used the font "a red bucket".


I got these bottles years ago to give as gifts with bath salts inside. I must have bought way too many, because when I was cleaning out the basement, I found all these. Aren't they just the cutest jars?


Wednesday, April 18, 2012

Jelly Roll Skirt


Back in March I featured a skirt from Ocassionally Crafty. You can find the full tutorial over at Moda Bake Shop.

I was going to make my daughter one for Easter. Well I didn't quite get to it. Spring break was the week following Easter, so I decided to let my daughter {she's 9} make it. She sewed together all the strips and I did the pleats, waistband and hem.  She did a great job. 

I've never used a jelly roll before. I am hooked! I love how everything just goes together so well without spending an hour at the store finding coordinating fabrics. I bought another roll and will be making my two little girls some skirts too.


The tutorial is great too! Sarah teaches you how to make this in any size. I'm kinda wanting one for myself!