Wednesday, November 27, 2013

Easy Bow Pendant Necklace

easy bow pendant necklace
Today is the last and final piece for my New Year's Eve project for Prima Bead. I've saved the easiest for last.

easy bow pendant necklace

Connect the red and sliver beads together by sliding them onto a head pin and then forming a loop at the top. Repeat three times. Attach them all to the bow with a jump ring. Add another jump ring to the top of the bow and slide it on a ready to go chain. Easy Peasy!


I think this would look great with black chain and findings too.

Be sure to check out my other New Year's Eve jewelry:
Three Stranded Bracelet
Chain and Bead Necklace

  I am a Prima Bead Blog Team Member. I receive product from Prima Bead. In return, I create jewelry pieces from that product, and share about them through my blog and other social media outlets. All opinions expressed in this post are mine.

Tuesday, November 26, 2013

How to Make a Chain and Bead Necklace

How to Make a Chain and Bead Necklace

Today I'm sharing chain and bead necklace I made for my New Year's Eve project with Prima Bead. I love the look the layers of chain add to the necklace. I also love the classic feel of grey and silver. This piece will go with just about anything.

You will need:
chain
19 coordinating beads and eye pins
8 jump rings
clasp

How to Make a Chain and Bead Necklace


Step 1 - cut three pieces of chain 2" long.

Step 2 - attach the chain with a jump ring.

Repeat steps 1 & 2 three more times. Once with 2" chain and twice with 2 1/2" chain.

Step 3 - Form a loop on each bead using eye pins.

Step 4 - connect 5 beads together, by opening the loop, inserting the next bead and closing the loop.

Step 5 - same as step 4, except using 7 beads.

Repeat step 5.

Step 6  - connect all your pieces with jump rings, using the 5 beads as the center. Add your two 2" chain pieces to both sides. Then add your 7 bead pieces to both sides, and finally your 2 1/2" pieces to both sides. Add a clasp and you're done!

How to Make a Chain and Bead Necklace
Be sure to check out my other New Year's Eve jewelry:
Three Stranded Bracelet
Bow Pendant Necklace
 

  I am a Prima Bead Blog Team Member. I receive product from Prima Bead. In return, I create jewelry pieces from that product, and share about them through my blog and other social media outlets. All opinions expressed in this post are mine.

Monday, November 25, 2013

How to Make a Three Stranded Bracelet


how to make a 3 stranded bracelet


I'm excited to share with you my latest creations using Prima Bead products. We were asked to make some New Year's Eve statement pieces. Here's what Prima Bead sent me.


I'm usually quite the bore on New Years Eve. I make my kids go to bed by 9 or 10 {even then they're super crabby the next day} Since my husband is a police officer, he usually has to work, so there's really no point for me to stay up either. Maybe I'm just getting old....

So, since I don't have a fun party to go to this year, I wanted to make something that was sparkly and a little fancy, but not too over-the-top. 

Today I'm going to share my favorite of my three new jewelry pieces. A three stranded bracelet. Basically I just followed my bracelet tutorial. Once I finished the first strand of beads, I added another strand of wire onto the clasp and  strung on more beads. Finally, I added one more strand with beads to make a three stranded bracelet.

3-in-1 bracelet tutorial

One thing I learned is that it is easier to use a smaller wire for these multiple strands. I started out with a thick wire and it was not very flexible and wouldn't lay right. So I switched it out for some thinner wire and it worked much better.

sparkle and pearl bracelet

I love these sparkly beads. They're so pretty when the light catches them.  I used what they sent me, plus some from the Tis the Season collection they sent me a few months back.

3 stranded bracelet

Make sure to come back and see my other two projects:
Chain and Bead Necklace
Bow Pendant Necklace
  I am a Prima Bead Blog Team Member. I receive product from Prima Bead. In return, I create jewelry pieces from that product, and share about them through my blog and other social media outlets. All opinions expressed in this post are mine.

Friday, November 22, 2013

Easy Kids Turkey Crafts

 I've been super busy this week. I'm working on a super fun Christmas idea that I hope to be able to get done and posted for the beginning of December. I've also been working on some jewelry that should be up next week.

So today, I'm going to share an old post from a few years back.  Hope you have fun making some easy kids crafts.

Easy Kids Turkey Crafts


This one was pretty fun. We just pressed our fingers onto stamp pads and then onto the card in the shape of a turkey tail.
easy kids turkey crafts

Look how unique they all are.

turkey placecards

Here's the back, I hope you can see how I got them to stand.


 Here's the other kind of turkeys we made.

kids turkey craft

We glued the head on, but we stapled the tails.  We made probably 20 and it was just faster that way.

Go try them - they really are very easy and fun for kids.


More Kids Thanksgiving Crafts


Monday, November 18, 2013

DIY Gratitude Journals

Today I'm sharing how to make quick and easy paper notebooks. Our family is using them as thankful journals. These journals are so versatile - you can make them in any color/pattern you like. It's also easy to customize the size of these little notebooks to fit your needs.
DIY Thankful Journals
Last Sunday, I decided to make thankful journals for myself and my family. I think it's important to be thankful all the time, but we often forget. This time of year is a good reminder to remember all that we have and be grateful for it. I have the journals on the kitchen table where we see them and will hopefully remember to use them.


DIY Gratitude Journals

Easy DIY Notebooks


I think sometimes it's easy to just list everything we're thankful for, but not really internalize it. So I decided to have a question of the day. Each day I write on our little chalkboard a question. For example, Why are you thankful for your eyes? or your family? the scriptures? or your home? That causes us to reflect a little more and really be grateful.

diy gratitude journals

  The thankful journals were a quick project and turned out so cute. I love the fact that they have only a dozen pages in them. I wanted my kids to be able to fill them up, without being overwhelmed.

Want to make your own Thankful Journals?

Let's get started...

For each notebook you will need:
3 sheets copy paper
1 sheet scrapbook paper
scissors/cutting board
sewing machine/thread

How to Make Thankful Journals
To begin, cut your copy paper in half to equal 5 1/2 X 8 1/2 inches. Cut your scrapbook paper to the same dimensions.  You will now have 6 pieces of copy paper and 2 sheets of scrapbook paper. You only need one sheet of the scrapbook paper, save the other for your next book.

Precisely fold each paper in half. Then stack them all inside each other.

Sew along the folded end about 1/8 - 1/4 inch from edge.

DIY Thankful Journal
The paper from the middle of the notebook will stick out farther than the cover. Just trim it down.

How to Make Your Own  gratitude Journal

This really was a quick project. I think it took me more time to figure out what I was going to do and what paper I wanted for the covers, than it took me to make them.

DIY Thankful Journals

What tips do you have to help your kids {or yourself} remember to be thankful?

You may also like: 

hand made gratitude journals in a basketdiy gratitude journals

Thursday, November 14, 2013

How to Make a Circle Wrap-Around Ruffle Skirt

How to Make a Circle Wrap-Around Ruffle Skirt


I previously shared this tutorial over at UCreate.

Early in the summer, I went into a little boutique store in our small town. I'm the kind of person that does not spend money in boutiques. I go in looking for ideas. And this time I found the cutest little skirt that I knew I had to try and make myself. I hurried out to the truck and quickly drew a little sketch so I wouldn't forget. It's a good thing too, because I didn't end up having time to make them until the kids went back to school.

How to Make a Circle Wrap-Around Ruffle Skirt
So let's get on with the tutorial.

Here's what you need:
Fabric: The amount of fabric you need will depend on the size of skirt your making, but just to give you an idea, I bought three yards of fabric and made a skirt for both my 4 year old and 6 year old.

Coordinating fabric: I used muslin for the ruffle and waistband. I just used what I had, I'm sure a yard would be plenty.

4 Buttons
Thread
Sewing machine
Basic sewing supplies


The skirt is made using a variation of the circle skirt. So first we need to make a pattern. Begin my measuring your daughter's waist.  Then add 1 inch. Divide that number by pi {3.14}. That will give you the diameter of the circle. Then divide by 2.

For example: My daughter's waists are both 22 1/2".

(22.5 + 1) / 3.14 = 7.48
7.48 / 2 = 3.74"  We'll call this our waist number.

For ease in measuring I just rounded that number up to 3.75 or 3 3/4"

With one point of a protractor in the corner, and the length set to your number draw quarter circle on your paper.


How to Make a Circle Wrap-Around Ruffle Skirt

Now we need to figure out the length of the pattern. Measure how long you want the skirt to be on your daughter. I like it just past the knee. Take the length measurement and subtract 1" and add your waist number. {subracting 1" adjusts for the the ruffle and also the seam allowance}

For example: I wanted one of the skirts to be 13 inches long.

13 - 1 + 3.75 = 15.75"  Using this number make another quarter circle on your paper.

My protractor was not even close to being long enough so I just tied two pencils together with string. It took a bit of adjusting to get it the right length. I just taped together four pieces of paper to make it big enough. Or you could use newspaper or wrapping paper. Cut this out and now you have your pattern.


How to Make a Circle Wrap-Around Ruffle Skirt
Now let's cut out our fabric. You will be cutting on the fold on one side of your pattern. You need to cut out three pieces.

How to Make a Circle Wrap-Around Ruffle Skirt

Next sew two pieces together along the straight edge right sides together. Then sew on your third piece along the straight edge. I used a serger, but you can just sew it and then zig zag or use pinking shears to prevent fraying.

How to Make a Circle Wrap-Around Ruffle Skirt

You will end up with one circle. One half of the circle will be overlapped.


How to Make a Circle Wrap-Around Ruffle Skirt


Now, on one end we will be cutting it shorter. This just adds to the cuteness and draws your eye even more to the ruffles. I tried this two different ways, the first time I measured 4 inches from the bottom of the skirt and then placed my pattern on and cut along the bottom edge.  

How to Make a Circle Wrap-Around Ruffle SkirtThe second skirt I did 4 inches from the top of the skirt. If I did it again, I might find the middle and cut from there. 

How to Make a Circle Wrap-Around Ruffle Skirt
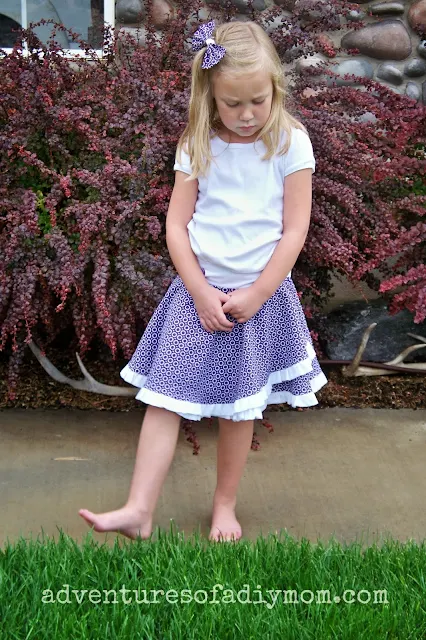
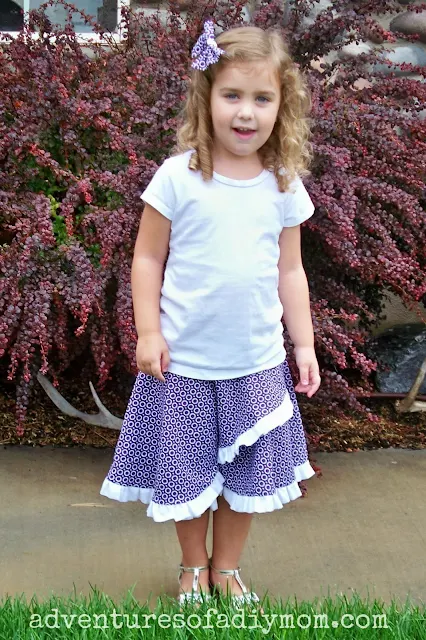
Here's a quick look at what they look like depending on how you cut it.
The picture on the left is cutting 4" from the bottom. The picture on the right is cutting 4" from the top. You decide how you like it.
How to Make a Circle Wrap-Around Ruffle Skirt

Now, let's start on the ruffle. To determine the length of the ruffle you need to measure the bottom circumference of the skirt. Then multiply by  1.75. This is the length of the ruffle.
For example: the bottom circumference was 69.
69 x 1.75 = 120.75
The width of the ruffle is 3". You will want to cut 3" strips and then sew them together to make it long enough.

How to Make a Circle Wrap-Around Ruffle Skirt
Iron your ruffle in half lenthwise.

How to Make a Circle Wrap-Around Ruffle Skirt

Next baste along the open edge. Basting is using the longest stitch on your machine.

How to Make a Circle Wrap-Around Ruffle Skirt

Now begin gathering, by pulling on one string. The fabric will begin to bunch up. Keep pulling on the string and sliding the fabric along the string until it is all gathered. This will seem to take forEVER.

Pull from one side about half way. Then pull from the other side for the other half. If you pull one way the entire way then your string will come out and the end of it will come un-stitched. {Speaking from experience}

It will also help if you mark with pins each third of your fabric. Then when you pin it on the skirt in the next step you will be able to do it evenly.

How to Make a Circle Wrap-Around Ruffle Skirt

Now attach it to your skirt with pins. You want the raw edges of the skirt and the raw edges of the ruffle pinned together.  You will need to adjust your ruffles so they are fairly uniform throughout. Sew in place, then serge, zig zag stitch or use pinking shears to help with fraying. Then press the ruffle down.

How to Make a Circle Wrap-Around Ruffle Skirt

Now for the waistband. For this, use your daughter's actual waist measurement and add 3 inches. The width of the waistband is  5".

How to Make a Circle Wrap-Around Ruffle Skirt

Fold in half lengthwise and press.

How to Make a Circle Wrap-Around Ruffle Skirt

Now sew it to the top of the skirt, keeping raw edges together. If your waistband ends up a bit to long just cut it to length.

How to Make a Circle Wrap-Around Ruffle Skirt
Now to finish off the sides of the skirt, fold over fabric 1/4 inch and press.
How to Make a Circle Wrap-Around Ruffle Skirt

Fold over 1/4 inch more and press again.

How to Make a Circle Wrap-Around Ruffle Skirt

Stitch in place. Repeat for other side.

How to Make a Circle Wrap-Around Ruffle Skirt

To add the buttons, I started by adding the button holes on the front layer of the waistband. I did the outside buttonholes real close to the side seams and then measured 2 1/2" in and added another set of buttons. Then I placed the skirts on my girls, using pins to keep them on. I marked where to add the buttons. Now just sew the buttons in place.

How to Make a Circle Wrap-Around Ruffle Skirt

Here's the final product. The skirts turned out almost as cute as my girls :)

How to Make a Circle Wrap-Around Ruffle Skirt

How to Make a Circle Wrap-Around Ruffle Skirt