Monday, December 16, 2013

Nativity Christmas Tree

For those of you who have been following along with my 12 Days of CHRISTmas Ornaments, here's my nativity tree.

Nativity Christmas Tree

 I have two 3' trees that I put the nativity ornaments on - one on each side of our big tree.


In case you missed some of the tutorials. Here are links to them all:

Wood Slice Nativity Ornaments
Angel Wire Ornaments
Clothespin Nativity Ornament
Twine Wrapped Star
Sheep Ornament
Felt Nativity Ornament
Shepherd's Crook Ornament
Stable Ornament
Wiseman Ornament
Manger Ornament
Canning Ring Framed Embroidered Ornament
Paint Stick Ornament
Greeting Card Ornament


Nativity Christmas Tree Ornaments


Sunday, December 15, 2013

Greeting Card Ornament - {12 Days of CHRISTmas Ornaments}

The last ornament is the very easiest. I wanted to hang a picture of the nativity or of Christ on the tree. While I was at Deseret Book, I could not find what I was looking for. Then in a stroke of genius, I thought, I wonder if they have any Christmas cards with a nativity scene. I really like this darling picture, and the fact that it's not just a rectangle.

Greeting Card Ornament
"Oh Come, Let Us Adore Him" Oh Come, All Ye Faithful

The how to for this ornament is very simple: Cut off the back of the card. Hole punch the top. Add some twine for hanging.

Be sure to check out my other Nativity ornaments:


Wood Slice Nativity Ornaments
Angel Wire Ornaments
Clothespin Nativity Ornament
Twine Wrapped Star
Sheep Ornament
Felt Nativity Ornament
Shepherd's Crook Ornament
Stable Ornament
Wiseman Ornament
Manger Ornament
Canning Ring Framed Embroidered Ornament
Paint Stick Ornament
Greeting Card Ornament


Saturday, December 14, 2013

Paint Stick Ornaments - Nativity Ornament Series

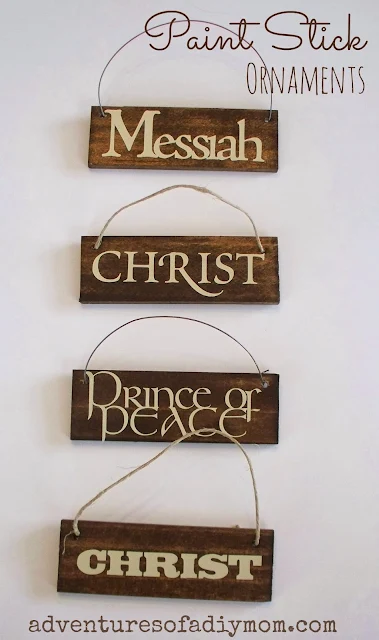
Today's ornament is a simple wooden ornament with vinyl words. Made from paint sticks, vinyl and wire or twine, these ornaments are very inexpensive.
DIY Paint Stick Ornaments
"For unto us a child is born, unto us a son is given: and the government shall be upon his shoulder: and his name shall be called Wonderful, Counsellor, The mighty God, The everlasting Father, The Prince of Peace." Isaiah 9:6

I thought it fitting to use some of the different names of Christ to go on my nativity tree. You could take this idea and transform it however you like to fit with your theme.

To make these paint stick ornaments you will need:

large paint sticks
twine or wire
vinyl and vinyl cutting machine
saw
drill

I began by sanding down the words that come on the paint sticks. Then I cut them into 4" pieces. Next I drilled two small holes in the top corners. I opted to stain some of my paint sticks. Once they were dry, I added the vinyl lettering. Then I added wire for hanging. When I ran out of wire, I found that twine worked just as well.

DIY paint stick ornaments
Here are a few that I didn't stain. I think it would have looked nice with a brown vinyl, but I used what I had.


Be sure to check out my other Nativity ornaments:

Wood Slice Nativity Ornaments
Angel Wire Ornaments
Clothespin Nativity Ornament
Twine Wrapped Star
Sheep Ornament
Felt Nativity Ornament
Shepherd's Crook Ornament
Stable Ornament
Wiseman Ornament
Manger Ornament
Canning Ring Framed Embroidered Ornament
Paint Stick Ornament
Greeting Card Ornament


Friday, December 13, 2013

Embroidered Mason Jar Lid Ornament

Today's ornament is an embroidery of the Baby Jesus. I originally made some of these with regular embroidery hoops. But then I saw a great idea and just had to use it. A wide-mouth canning ring used as a frame.

Canning Ring Framed Embroidered Ornament

Embroidered Mason Jar Lid Ornament


 "Glory to God in the highest, and on earth peace, good will toward men." Luke 2:14

First, let me tell you my little secret of finding these cute little embroideries patterns for free. Coloring pages. Yep, I searched the net for nativity themed coloring pages, printed them out to the size I wanted and traced them onto the fabric. Then it was just a matter of stitching them.
Here are the links to the pages I used:
Holy Family 
Baby Jesus
Baby Jesus with Sheep

Here's a step by step of how I framed them with a canning ring:

how to frame an embroidery with a canning ring
Step 1 - Gather your supplies: You will need your embroidery, a piece of batting, a wide mouth canning ring, twine, hot glue and two pieces of cardboard. {I used the top of the canning ring to trace onto the cardboard and then cut them out.}

Step 2 - Place your embroidery face down, place the batting on top and then the cardboard circle. Make sure it's centered on your embroidery

Step 3 - Place all three pieces from step 2 into your canning ring.

Step 4 - Hot glue the fabric down.

Step 5 - Hot glue around your second piece of cardboard and place it in the ring.

Step 6 - Now I needed to figure out how to hang it. I pushed out the embroidery and then hot glued a piece of twine inside the canning ring. Then pushed the embroidery back in place.

embroidered nativity scene
 I love this sweet little scene.

And another that I did using a regular embroidery hoop.

Embroidered Baby Jesus
Be sure to check out my other Nativity ornaments:
Wood Slice Nativity Ornaments
Angel Wire Ornaments
Clothespin Nativity Ornament
Twine Wrapped Star
Sheep Ornament
Felt Nativity Ornament
Shepherd's Crook Ornament
Stable Ornament
Wiseman Ornament
Manger Ornament
Canning Ring Framed Embroidered Ornament
Paint Stick Ornament
Greeting Card Ornament


Thursday, December 12, 2013

How to Make a Manger Ornament - Nativity Ornament Series

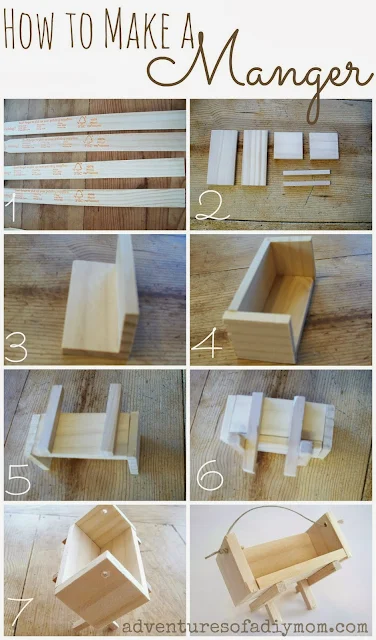
Learn to make a manger ornament.  These cute little mangers are made from paint sticks and square dowels.


DIY Manger Ornament
"And this shall be a sign unto you; Ye shall find the babe wrapped in swaddling clothes, lying in a manger." Luke 2:12

 So I originally found this idea at It's Always Autumn. She has a printable pattern. The problem was that my printer wasn't working. Plus, I like working with actual measurements. So here's how I did it.


Learn how to make a manger ornament using paint sticks and square dowels. A must have for any nativity themed Christmas tree. #nativityornament #christmasornament #adventuresofadiymom #mangerornament #diynativity #diyornament


To make a Manger Ornament you will need: 

paint sticks {the large ones from Home Depot, I've heard that paint sticks vary in size, so you may have to adjust your measurements if you use a different size}
1/4" square dowels
hot glue
stain (optional)
saw
drill w/small bit

How to Make a Manger Ornament from Paint Sticks
Step 1 - Sand off  the writing that comes on the paint sticks.

Step 2 - Cut your pieces to the following measurements:
From paint stick:
    Cut 2 - 1 3/8 X 1 3/8
    Cut 1 - 2 3/4 X 1 3/8
    Cut 1 - 2 3/4 X 1 1/8
From square dowel:
    Cut 4 - 2 1/4"
*Note - I just realized my picture has only 2 dowel pieces. You will need 4.

If you desire to stain your wood, do so before gluing together. 

Step 3 - Start with your 2 3/4" sized pieces. Hot glue the smaller one to the larger one. I found if I held one of my square pieces next to it, I could get it square.

Step 4 - Hot glue the square ends of the manger in place.

Step 5 - Hot glue two of your square dowels to the side of the manger. {See picture for placement}

Step 6 - Hot glue the other two square dowels to the other side of the manger. {See picture for placement}

Step 7 - Drill a small hole at each end of the manger.

Step 8 - Add some twine or wire for hanging.

DIY Manger Ornament

Be sure to check out my other Nativity ornaments:
Wood Slice Nativity Ornaments
Angel Wire Ornaments
Clothespin Nativity Ornament
Twine Wrapped Star
Sheep Ornament
Felt Nativity Ornament
Shepherd's Crook Ornament
Stable Ornament
Wiseman Ornament
Manger Ornament
Canning Ring Framed Embroidered Ornament
Paint Stick Ornament
Greeting Card Ornament


Wednesday, December 11, 2013

Wisemen Ornament - {12 Days of CHRISTmas Ornaments}

Today's Ornament is the Wisemen.

Wiseman Ornament
 "And when they were come into the house, they saw the young child with Mary his mother, and fell down, and worshiped him: and when they had opened their treasures, they presented unto him gifts; gold, frankincense, and myrrh." Matt 2:11

I took full advantage of my silhouette with this ornament. I downloaded the ornament and the wisemen. Then it was just a matter of cutting them out and assembling them.

Wiseman Ornament
I cut out two tops, one out of card stock and one out of vinyl. I placed the vinyl on top of the card stock and then glued it to the ornament with a glue stick. Then I added the vinyl wisemen to the ornament.

Wiseman ornament


Be sure to check out the other Nativity ornaments I will be sharing:

Wood Slice Nativity Ornaments
Angel Wire Ornaments
Clothespin Nativity Ornament
Twine Wrapped Star
Sheep Ornament
Felt Nativity Ornament
Shepherd's Crook Ornament
Stable Ornament
Wiseman Ornament
Manger Ornament
Canning Ring Framed Embroidered Ornament
Paint Stick Ornament
Greeting Card Ornament


Tuesday, December 10, 2013

How to Make a Nativity Stable Ornament


Today's nativity ornament is a stable. Using craft sticks, I created an simple, inexpensive ornament that is easy to make. 

Adding a coat of stain to the sticks gives it that rustic look that I love. Create your own. All you need is a few supplies and a couple minutes.

How to Make a Stable Ornament with craft sticks- Nativity Ornament


 "And she brought forth her firstborn son, and wrapped him in swaddling clothes, and laid him in a manger; because there was no room for them in the inn." Luke 2:7


***For those of you new to my blog, I've created a series of nativity ornaments to help remind my family of the true meaning of Christmas. Here's a list of them {pictures at the bottom of the post}: 

Wood Slice Nativity Ornaments
Angel Wire Ornaments
Clothespin Nativity Ornament
Twine Wrapped Star
Sheep Ornament
Felt Nativity Ornament
Shepherd's Crook Ornament
Stable Ornament
Wiseman Ornament
Manger Ornament
Canning Ring Framed Embroidered Ornament
Paint Stick Ornament
Greeting Card Ornament


How to Make a Nativity Stable Ornament

Monday, December 9, 2013

Shepherd's Crook Ornament - {12 days of CHRISTmas Ornaments}

Today's ornament is a shepherd's crook. With some wire, twine and hot glue, you can make some in no time.

Shepherd's Crook Ornament
 "And there were in the same country shepherds abiding in the field, keeping watch over their flocks by night." Luke 2:8

Cut a piece of wire 7 1/2" long. {I used a cloth stem wire}
Find something round and use it to wrap the top of the wire around.
Hot glue some twine to the curved end of the crook.
Start wrapping the twine around the wire, using a dab of hot glue as needed to keep the twine in place. {I mostly just used it at the beginning and end.}
Finish it off with more hot glue.
That's all there is to it, pretty easy!

Be sure to come back. Here are a few of the other Nativity ornaments I will be sharing:
Wood Slice Nativity Ornaments
Angel Wire Ornaments
Clothespin Nativity Ornament
Twine Wrapped Star
Sheep Ornament
Felt Nativity Ornament
Shepherd's Crook Ornament
Stable Ornament
Wiseman Ornament
Manger Ornament
Canning Ring Framed Embroidered Ornament
Paint Stick Ornament
Greeting Card Ornament


Saturday, December 7, 2013

Felt Nativity Ornament - {12 days of CHRISTmas Ornaments}

Today's ornament is a cute little felt nativity. I followed a tutorial over at Wild Olive. She has a printable pattern and everything.


 "Mary, Mary, hush, see the Child.  Joseph, Joseph, look see how mild! This is Jesus; this is our King. This is our Savior his praises we sing. " The Shepherd's Carol, Children's Songbook pg 40.


Be sure to come back. Here are a few of the other Nativity ornaments I will be sharing:
Wood Slice Nativity Ornaments
Angel Wire Ornaments
Clothespin Nativity Ornament
Twine Wrapped Star
Sheep Ornament
Felt Nativity Ornament
Shepherd's Crook Ornament
Stable Ornament
Wiseman Ornament
Manger Ornament
Canning Ring Framed Embroidered Ornament
Paint Stick Ornament
Greeting Card Ornament


Friday, December 6, 2013

How to Make a Sheep/Lamb Ornament - Nativity Ornament Series

Today's ornament is the sheep. Lambs are a part of almost every nativity. So, of course, I had to include them in my CHRISTmas ornament series.

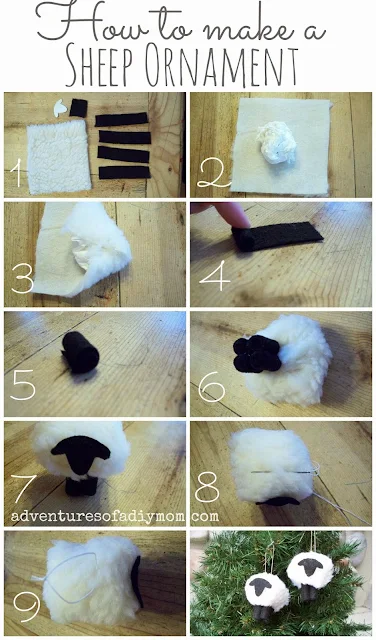
How to make a Sheep Ornament
"And Jesus saith unto him, Feed my sheep." John 21:17

Sheep are symbolic of many things. Jesus himself is referred to as the Lamb of God because of his sacrifice for our sins. We are also considered sheep and Jesus our shepherd.

Besides all the scriptural significance of sheep, they also have a special meaning to me because my grandpa was a sheep rancher.

How to Make a Sheep/Lamb Ornament


  To make a lamb ornament you will need: 

*faux sheep fur - 5 1/4" x 5 1/4" square {an 1/8th of a yard will be plenty to make several sheep}
 *black felt - 4 pieces 3 3/4" X 1" plus a scrap for the face
*toilet paper or paper towel, wadded up into a ball that's between 2 and 2 1/2"
*hot glue
*string and needle

DIY Lamb Ornament
Step 1 - Gather your supplies and cut out your pieces. I just drew a simple face on paper and then used it to cut out the felt face.

Step 2 - Place your wadded toilet paper in the center of the faux sheep wool.

Step 3 - Taking a section at a time, fold the fur over the ball and hot glue in place.

Step 4 - Take a strip of felt and roll it up.

Step 5 - Hot glue in place and repeat with the three other legs.

Step 6 - Hot glue the legs together and then glue them to the bottom of the sheep.

Step 7 - Hot glue the face on.

Step 8 - Thread a needle and insert into the top of the sheep, about where the neck would be.

Step 9 - Tie the thread in a knot, forming a loop for hanging.

DIY Sheep Ornament

Be sure to come back. Here are a few of the other Nativity ornaments I will be sharing:

Wood Slice Nativity Ornaments
Angel Wire Ornaments
Clothespin Nativity Ornament
Twine Wrapped Star
Sheep Ornament
Felt Nativity Ornament
Shepherd's Crook Ornament
Stable Ornament
Wiseman Ornament
Manger Ornament
Canning Ring Framed Embroidered Ornament
Paint Stick Ornament
Greeting Card Ornament

Thursday, December 5, 2013

Twine Wrapped Star - {12 days of CHRISTmas Ornaments}


Today's ornament is a twine wrapped star.

Twine Wrapped Star Ornaments"and, lo, the star, which they saw in the east, went before them, till it came and stood over where the young child was. When they saw the star, they rejoiced with exceeding great joy." Matt. 2:9-10

To make the star ornaments you will need: 

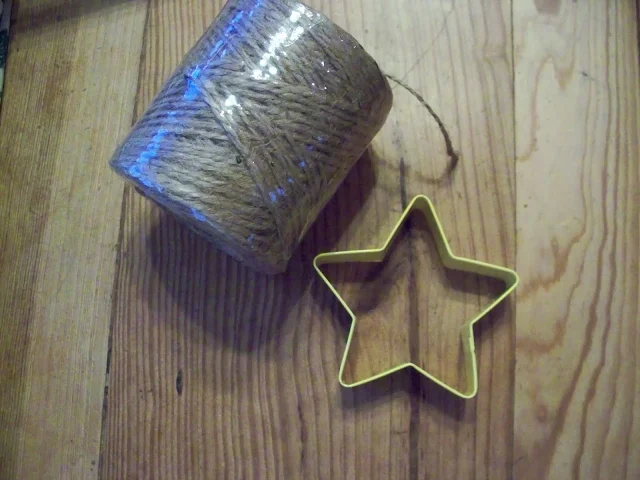
star shaped cookie cutters {I used metal ones}
twine
hot glue

Twine Wrapped Star Ornaments
 Start off with a long piece of twine. Add a dab of hot glue to the cookie cutter. Attach the twine and start wrapping. I only added more hot glue when I felt like it needed it to stay in place. Mostly at the tips of the star. If you run out of twine, just get a new piece and continue wrapping. Once it was done, I cut a small piece of twine and tied with a knot to form a loop for hanging.

Twine Wrapped Star Ornaments
I love these stars. This is the kind of star I think of when I think of the star in the east.

Of course they were harder to wrap, so I mostly did regular stars.

Twine Wrapped Star Ornaments
These stars were super easy, but a little time consuming.

Twine Wrapped Star Ornaments


Be sure to come back. Here are a few of the other Nativity ornaments I will be sharing:

Wood Slice Nativity Ornaments
Angel Wire Ornaments
Clothespin Nativity Ornament
Twine Wrapped Star
Sheep Ornament
Felt Nativity Ornament
Shepherd's Crook Ornament
Stable Ornament
Wiseman Ornament
Manger Ornament
Canning Ring Framed Embroidered Ornament
Paint Stick Ornament
Greeting Card Ornament


Wednesday, December 4, 2013

How to Make a Clothespin Nativity Ornament - Nativity Ornament Series

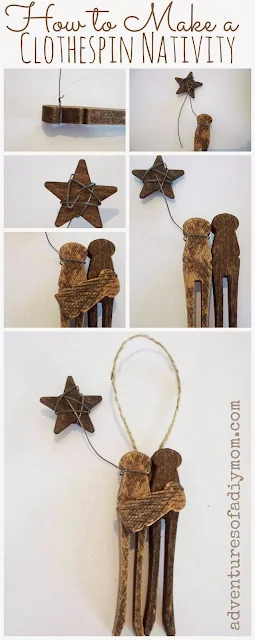
Learn to make this charming nativity ornament made from clothespins, a wooden star and wire. The perfect way to decorate for and celebrate the true meaning of Christmas.

Clothespin Nativity Ornament
Today's ornament is a nativity made from old fashioned clothespins. I got the idea from Shaken Together. I ended up using different kind of clothespin and I love how it turned out.

"And they came with haste, and found Mary, and Joseph, and the babe lying in a manger. " Luke 2:16


To make these clothespin nativity ornaments you will need:

3 old fashioned clothespins {Cut one of them just where the "legs" start}
wooden star
wire
twine
hot glue
stain

How to Make a Clothespin Nativity Ornament
If you would like, stain your clothespins and star. This is totally optional. I stained some and left some plain. 

Begin by wrapping the wire around the neck of one clothespin {Mary}. Twist it together and clip off any excess.

Leaving a length of an inch or two, start wrapping the wire around the star.

Clip off excess wire, leaving just enough to tuck it back under a section of wire.

Hot glue a second clothespin {Joseph} to the first, so that it it slightly higher.

Hot glue the cut clothespin {Baby Jesus} on top of the two others.

Glue twine to the back for hanging.

DIY Clothespin Nativity Ornament
Be sure to come back. Here are the other Nativity ornaments I will be sharing:
Wood Slice Nativity Ornaments
Angel Wire Ornaments
Clothespin Nativity Ornament
Twine Wrapped Star
Sheep Ornament
Felt Nativity Ornament
Shepherd's Crook Ornament
Stable Ornament
Wiseman Ornament
Manger Ornament
Canning Ring Framed Embroidered Ornament
Paint Stick Ornament
Greeting Card Ornament


Tuesday, December 3, 2013

How to Make a Wire Angel Ornament - Nativity Ornament Series

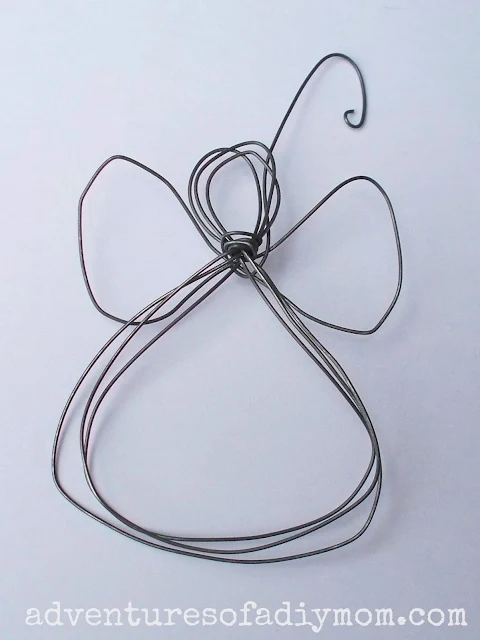
Learn how to make an angel ornament out of wire. This easy diy Christmas ornament is a perfect addition to your Christmas tree. All you need is some wire to create these angel nativity ornaments.

This year I decided to make a nativity tree with a small Christmas tree. I wanted all of the ornaments to have something to do with the first Christmas.

The last 12 days before Christmas, I want to have the kids hang one ornament a day and we'll talk about what it is and why it's important.

Wire Angel Ornament Tutorial
 It took a lot of time coming up with ideas, searching the net and Pinterest, and even more time making the ornaments, but I've almost got them all done.

 As I write this, I still have a few ornaments to finish up, but I'm hoping to get them done this week. Once they're all done, I'll get a picture of them all together on the tree.


So for the next couple weeks, I'll be sharing a different ornament each day, with a scripture or quote to go along with it.


 "And the angel said unto them, Fear not: for, behold, I bring you good tidings of great joy, which shall be unto all people. For unto you is born this day in the city of David a Saviour, which is Christ the Lord" Luke 2:10-11


Before we get started, here are the links to all the rest of my Nativity Ornaments: 
Wood Slice Nativity Ornaments
Angel Wire Ornaments
Clothespin Nativity Ornament
Twine Wrapped Star
Sheep Ornament
Felt Nativity Ornament
Shepherd's Crook Ornament
Stable Ornament
Wiseman Ornament
Manger Ornament
Canning Ring Framed Embroidered Ornament
Paint Stick Ornament
Greeting Card Ornament


Today I'm going to show you how I made some cute little angels with just some wire. I got this idea off of Pinterest. Unfortunately, the links didn't go anywhere. So I had to figure out how to make them myself.

This post may contain affiliate links. Please see my full disclosure policy for details. 


I don't claim to be an expert on working with wire, but they ended up pretty easy.


How to Make a Wire Angel Ornament
You will need 20 gauge wire.

* Begin by making a figure 8 with your wire. Make sure your top part of the 8 is about 1/3 of the total size - it will be your head. Continue with this pattern until you have 5 layers of wire. Then wrap the wire a few times around the middle of your 8.

* Now we're going to make the wings. Make another figure 8 going horizontally. These will be your wings. Do this 3-4 times and wrap your wire as best you can around the wings.

* Leave an excess of a couple inches and cut your wire. Then curve the top to make a hanger, ending it off with a small loop. Then spread out the wire to make it look nice.

Here are a couple other styles I did.

DIY Wire Angel Ornament

 I made this one the same way as I did the first one, but the bottom part of the figure 8 I made a triangle shape. I also only wrapped it three times.

Wire Angel Ornament

 And this one I made the wings differently.

More DIY Ornaments

Wood Burned Ornaments