Tuesday, May 19, 2015

Peanut Butter Cookies with Reese's Pieces Recipe

I don't know about you, but for me May is a busy month.   It seems that a lot of things are starting or ending right now. We finished up dance, so of course we had dance recitals. We started T-ball and coach pitch for the little girls, so that means practices and games.

We've had Karate belt graduation and a track meet for my son. School is ending so there are end-of-school projects and programs to attend. On top of the extra things are the regular everyday things that still need to be done like laundry, dishes, and dinner.

Plus the yard work now that it's warm. Last week I barely sat down the whole week and the next two don't look much different.


Want to see more of our favorite cookies: Visit our Best Cookie Recipes page.
Peanut Butter Cookies with Reese's Pieces

Peanut Butter Cookies with Reese's Pieces 

Now on to the cookies! These peanut butter cookies are perfect for busy days. You make the dough ahead of time and keep it in the fridge.  Stick them in the oven as you sit down to dinner and you can have warm delicious cookies for dessert.
Peanut Butter Cookies Collage


 These cookies are packed with peanut butter flavor, with just the right amount of chocolate thrown in.

Peanut Butter Cookies with Reese's Pieces


Much to my daughter's dismay {since she's allergic} I've made these twice in the last month. I always make sure to have a treat for her too, like these chocolate chip cookies.

Peanut Butter Cookies with Reese's Pieces Recipe


More Peanut Butter Recipes:


More Cookie Recipes:


Peanut Butter Cookies with Reese's Pieces
Print

Peanut Butter Cookies with Reese's Pieces

Servings: 24
Author: Rachel Nielsen
Prep time: 10 MCook time: 8 MTotal time: 18 M
These peanut butter cookies are perfect for busy days. You make the dough ahead of time and keep it in the fridge. Stick them in the oven as you sit down to dinner and you can have warm delicious cookies for dessert.

Ingredients:

  • 3/4 c. peanut butter
  • 1/2 c. butter, softened
  • 1 c. brown sugar
  • 1 egg
  • 1 T. vanilla
  • 1 3/4 c. flour
  • 3/4 t. baking soda
  • pinch of salt
  • 1/2 c.  reese's pieces
  • 1/2 c. chocolate chips

Instructions:

  1. Mix the peanut butter, butter, egg, brown sugar and vanilla in a stand mixer for 2 minutes at medium speed.
  2. Add flour baking soda and salt and mix 1 additional minute.
  3. Stir in Reese's pieces and chocolate chips by hand.
  4. Using an ice cream scoop, scoop out dough and place it on a plate. Flatten cookies slightly.
  5. Cover and refrigerate for at least 2 hours.
  6. Bake at 350 for 8-9 minutes. 
  7. Let cool on pan for 2 minutes before removing to wire rack to cool completely.

Notes:

Crunchy or creamy peanut butter will work. Use what you prefer. You can use the mini or regular sized Reese's Pieces. These cookies are still yummy if you prefer not to chill the dough. They may take less time to bake, so keep a close eye on them.

Calories

183.74

Fat (grams)

10.16

Sat. Fat (grams)

4.56

Carbs (grams)

20.85

Fiber (grams)

1.04

Net carbs

19.82

Sugar (grams)

11.83

Protein (grams)

3.65

Sodium (milligrams)

126.74

Cholesterol (grams)

17.92
Nutritional information is automatically generated and is not guaranteed to be correct.
peanut butter cookies, chocolate chip peanut butter cookies, peanut butter cookies with reese's pieces
Dessert, Cookies
American
Created using The Recipes Generator

Thursday, May 7, 2015

Clear Tube Seed Bead Bracelets

These fun plastic tubing seed bead bracelets are super easy. They are the perfect bracelets for your little ones to help make. The color combos are endless.

Clear Tube Seed Bead Bracelets
I made these with my young women's group. They loved it. I got a big variety of seed beads and let them have at it. Some of them combined colors within each bracelet and they turned out so cute.

Clear Tube Seed Bead Bracelets
Want to make your own?

You will need:
1/4" tubing
3/8" tubing
seed beads
E6000 or hot glue


I found the tubing at Home Depot. It took me a while to find it even after asking a couple people for help. It's in the plumbing section. The 1/4" tubing that I got had printing on it. Luckily the sections between the writing were big enough to make a bracelet.

Clear Tube Seed Bead Bracelets


Cut a 7 3/4" piece of 1/4" tubing. {adjust this measurement to fit your wrist}
Cut a 1" piece of 3/8" tubing.

Clear Tube Seed Bead Bracelets

I started out using E6000, but soon realized that hot glue works just fine and it's so much faster not having to wait for it to dry. Add a dab of hot glue into one end of the bracelet. Add the beads.

Clear Tube Seed Bead Bracelets


Add another dab of hot glue to the other end of the bracelet. Once dry, attach each end together by inserting into the small 3/8" piece of tubing. Easy Peasy!

Clear Tube Seed Bead Bracelets


You could also fill them with glitter. It's a bit messier, but they turn out really pretty.

You could also try making these wax cord bracelets

Tuesday, May 5, 2015

How to Dye a Pillow

Have you ever wanted to dye something? I got some white throw pillows from my sister, who was getting rid of them.

At first I was going to use the pillow forms and make new pillow covers. But then I thought, what if I dyed them the color I want? I was nervous about it, I've never dyed anything before - not even my hair :) 

But I had nothing to lose. If I didn't like it I would revert to my original plan of making new pillow covers. I'm happy to say that after some trial and error, I'm loving my "new" pillows! 

How to Dye a Pillow Before and After
I'll walk you through the process and hopefully you can avoid some of the mistakes I made.

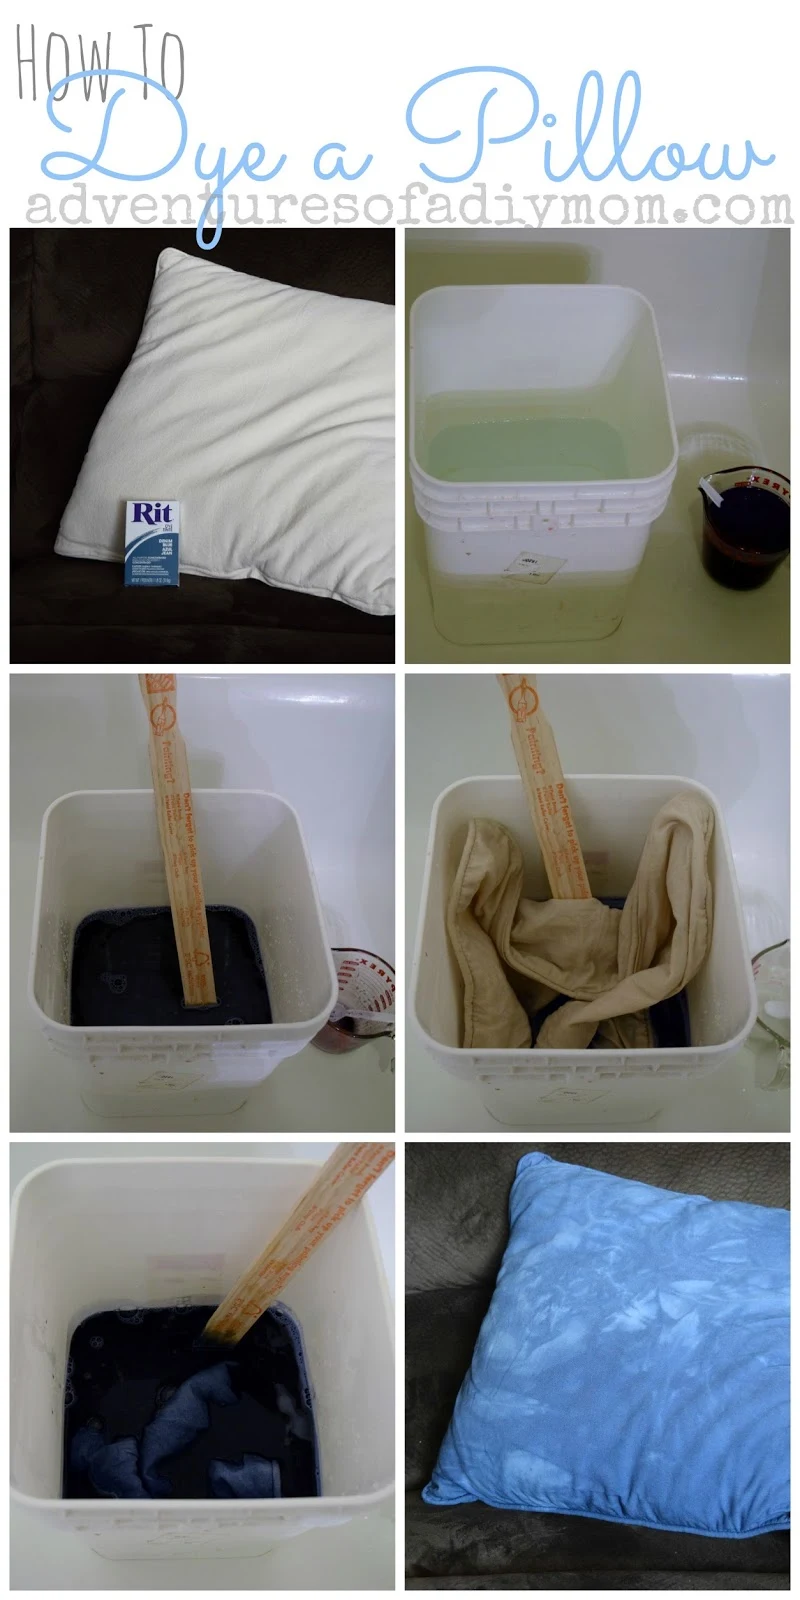
I started off with a box of Rit Dye Powdered Fabric Dye, Denim Blue {affiliate link}
I opened it up and read all the instructions. There are several ways you can dye - in the sink or bucket or in the washing machine. I decided to grab an old bucket from the garage to use. I set it in the tub to keep the mess contained.

Start with two cups hot water and let the dye powder dissolve thoroughly. This was my first mistake. The first pillow I tried this on, the dye wasn't dissolved completely and I had a few red spots on my pillow. I ran to the store and bought another box of dye to try again.

 In your bucket, add the recommended amount of hot water. A tip in the package said to use two packets of dye to get darker/bolder colors. Since I was doing a small project, I just did half the water with one packet of dye.  Once the dye is dissolved completely add it to the bucket. Stir to combine. I used a paint stick.

How to Dye a pillow - step by step
I removed the pillow cover and wet it down. Then added it to the dye. Let sit for 10-30 minutes. This was my second mistake. After the pillow cover was in for about 5 minutes, it was the perfect color. So I got it out, rinsed it, and washed with soap and warm water it as the instructions dictate. It came out like this:


Not at all what it looked like before washing! The color hadn't penetrated through the fabric completely. So it was back to the store again - this time I bought two packets of dye. I went through the whole process again, this time doubling the amount of water and dye from the previous time. I let the pillow covers sit in the bucket for over an hour, stirring every 15 minutes or so. {The instructions say to stir constantly - you can see that I have some variation in color on my pillows as a result of not stirring constantly - but I ended up liking it that way}  I rinsed out the pillows and decided to use cold water and no soap this time. It still washed out the color a bit, but not near as much as the first time.

Dyed Pillows
  I'm loving the pop of color these pillows brings to my otherwise very neutral living room.

Dyed Fabric Pillows
 Do you see the trunk near the chair? Can you believe I got it at a yard sale for only $2. I love it!

how to dye a pillow
And there's my $8 dresser you all helped me with.

Before we're through, lets get real. Here's what my living room looked like about 15 minutes before the above pictures were taken.

Dyed Pillows

My daughter had made a circle of "drums". I didn't capture the whole thing in the picture.

Just to recap,

Tips for dyeing fabric:
1- For bolder colors use two packets of dye or decrease the amount of water by half.
2 - Make sure the dye is completely dissolved in 2 c. water before adding it to the larger container.
3 -Leave the fabric in the dye for the recommended time or longer.
4- Wash in cold water with no soap.
5 -Don't dump your dye until you are positive you're happy with the results. If I would have kept the dye in the bucket the 2nd time, instead of dumping it, I could have just added the pillows again for a longer time period instead of having to buy more dye.


Adventures of a DIY Mom is a participant in the Amazon Services LLC Associates Program, an affiliate advertising program designed to provide a means for sites to earn advertising fees by advertising and linking to amazon.com.