This DIY kitchen cupboard is complete with a sink and faucet, a countertop, a dishwasher and a cabinet for storage.
My middle daughter is in love with "american girl" dolls. She has several, and fortunately doesn't care that they are not the real deal. She has a house set up in the corner of her bedroom for the dolls.
There is the farmhouse bed and a couch that my son made her. There is a closet she made from a cardboard box. She's gathered all sorts of things to create the doll's little living area.
All summer long she and her friend made blankets and clothes for their dolls. While searching for doll clothes patterns on pinterest she came across kitchen furniture.
She really wanted a kitchen complete with a sink, dishwasher, fridge and oven! For her birthday I made this sink/dishwasher cabinet and the fridge{tutorial is coming}. Maybe she'll get an oven for Christmas.
How to Build a Doll Sink and Dishwasher Cabinet
I found instructions for this doll kitchen cabinet. That one is pretty fancy - fashioned after an real cabinet with a toe kick and everything. It all looked a little too complicated for a kids toy, so I set out to simplify it a little. I wanted mine a bit smaller and a less complicated to make. Let's get started!Supplies to Build a Doll Sink
- 1" X 8" X 8' board
- 1" X 3" X 8' board
- 1" X 2" X 8' board
- 1/4" mdf - a 2' X 4' piece is plenty big
- round 6" cake pan
- 2 wire baskets - mine are 5 7/8" X 5 7/8"
- knob
- pull
- robe hook
- 4 hinges and screws
- heavy duty strong magnets
- stain
- paint
- finish nails for nail gun
- wood glue
- wood filler
- E6000 glue
Tools Needed to Build a Doll Sink
- miter saw or chop saw
- jig saw
- drill
- table saw
- finish nail gun
Cut List for a Doll Sink
- 2 pieces 1" X 8" X 15"
- 1 piece 1" X 3" X 15"
- 3 pieces 1" X 8" X 5"
- 2 pieces 1" X 8" X 15"
- 6 1/4" X 7 1/8" - 1/4" mdf
- 15" X 6 1/2" - 1/4" mdf
- 6 5/8" X 7 7/8" - cut from a 1" X 8"
- 6 5/8" X 8 1/8" - cut from a 1" X 8"
I have found that it's not always a good idea to cut all parts of the project at the same time. For example, slight variations can occur when measuring or cutting, or putting together your cabinet. This can create a small difference in the size of the pieces needed.
For this project, this is most important with the shelf and the doors. The easiest way to make sure your shelf or doors fit is to measure your piece and then cut it to fit.
Ready to start building?
Cut 2 pieces - 1" X 8" X 15"
Cut 1 piece - 1" X 3" X 15"
Now, let's figure out where to put the hole for the sink. Measure and mark the depth of a board along the side and the back. Since there will be a back splash board along the back we want to make sure the sink doesn't overlap where the board is supposed to be. Same with the side of the cabinet.
Trace around the bottom of the pan. Drill a hole near the line and then use a jig saw to cut out the circle. Test to see if your pan fits. I had to cut a little more off in a few places.
Now we need to cut the sides and center boards. Keep in mind that nothing has been assembled at this point - I just did a dry fit. Cut 3 pieces - 1" X 8" X 5"
Now we need to make a dado for our shelf. Measure 2 1/2" from the top and make a 1/4" dado cut on the side and the center pieces. Slide a piece of your mdf into the cuts to ensure that it fits before assembly.
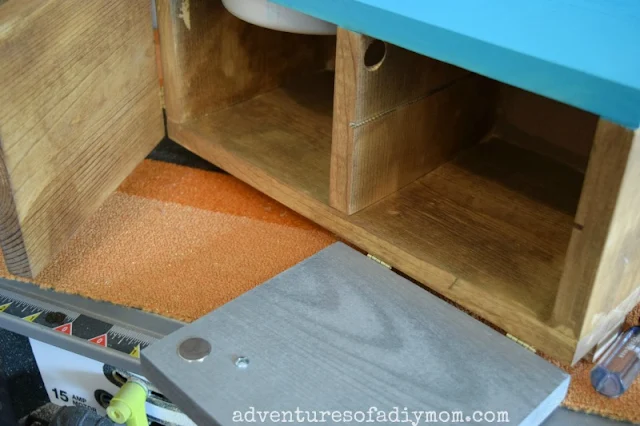
Now would also be a good time to drill a hole for your magnets - I used a wood bit the same diameter as the magnet and drilled the depth of the magnet. I did this in the upper corners near the front of the dishwasher.{I did this after the fact when my dishwasher door wouldn't stay closed - the hole had to be drilled at an angle because it was already assembled}
Next, sand down all the pieces we've cut so far and begin assembling the doll sink.
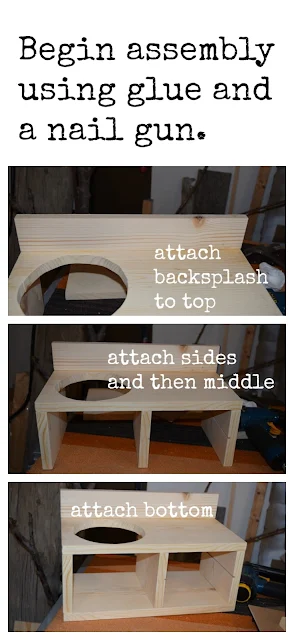
I put it all together using wood glue and a nail gun.
Attach the backsplash to the top, then attach the sides and middle. Finally attach the bottom.
Now let's make our shelf. Measure your shelf area. I cut a piece 6 1/4" X 7 1/8", using 1/4" mdf. Be sure to measure your project - you may need to slightly adjust the measurements. Slide the shelf into place.
Cut a piece 15" X 6 1/2" for back. Nail in place.
Because of the way that the dishwasher door opens with the hinges along the bottom, I needed to raise the whole cabinet a little for the door to open correctly. To do this I added a couple pieces of wood to the bottom.
Cut 2 pieces - 1" X 2" X 15" Sand, then glue and nail in place.
Now it's time for the doors. From a piece of 1" X 8" cut: cabinet door (left): 6 5/8" X 7 7/8" dishwasher door (right): 6 5/8" X 8 1/8"
There is a reason that the doors are not the same size. Since the cabinet door has the hinges on the side it wouldn't open and shut without hitting the dishwasher door. I didn't realize this until I dry-fit it. So I cut the cabinet door down 1/4 inch to accommodate this. Sand doors.
Now the fun part! Stain and paint. Use what you have, buy fun new colors, whatever you want!

Final assembly of the doors and adding the fun hardware details. I added two small hinges to the side of the cabinet door and the bottom of the dishwasher door. Put your sink in place before adding the robe hook {upside down to create the faucet} Add a knob to cabinet door and a pull to dishwasher door.
This is when I noticed that the dishwasher door didn't stay shut on it's own. My solution was to drill some holes for magnets to sit in on both the door and the frame. Then the pull of the magnets keeps the door shut.
If you do this, it would be best to drill the holes in the frame of the cabinet before assembly, but honestly it still works the way I did it. The hole just has a slight angle. I used E6000 to attach the magnets and let it dry overnight before using.
Now it's time to play! My daughter loves this new little sink.
I hope this tutorial is instructive and easy to understand.
You may also like:
Doll Clothes
Farmhouse Doll Bed
Doll Quilt for Farmhouse Bed


0 comments