This is the last part of my little mini series on making blankets. I first showed you how I tie blankets and then how I bind the blankets.
Today I'll share how I made my own homemade own quilting frames. Now, before we start, let me tell you that I made these about two years ago. I'm hoping I can remember well enough how I made them to give you clear instructions. Make sure to ask me if something doesn't make sense. If you are on a budget, and would like some inexpensive quilting frames, then this is for you.
DIY Quilting Frame
Cut list to make your own quilting frames:
4 pieces pine - 1' x 4' x 8'2 pieces pine - 1' x 4' x 8' - cut into (8) 16" lengths
plywood or particle board - cut into (4) 8' x 31" pieces
Tools Needed to Build Quilt Frame:
miter saw or table sawjig saw, sawzall, or band saw
4 clamps
tacks
How to Make Quilt Frames
When you select your pine boards for the top, pick through and get the best boards {straightest, smoothest, least knots}
Begin by cutting out your boards according to the cut list above.
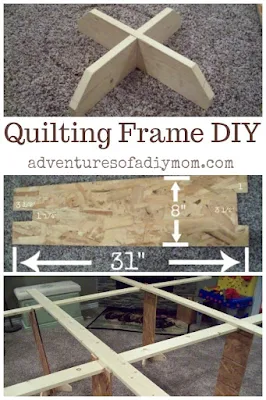
For the 16" pieces, I cut off the top corners at an angle. I measured and marked 2" from the corner and cut it at a 45 degree angle. I did this for all pieces.
Next we'll use the jigsaw to cut out some notches out of the boards to make the bases.
Four of the boards will have the notch in the bottom of the board, like the top board in the picture below.
Four of the boards will have the notch in the top of the board, like the bottom board in the picture below.
You will measure 7 5/8" from the side. Then cut a notch that is 3/4" wide and 1 3/4" deep. You will slide these two boards together as shown below. On some of the boards I had to trim a little more wood off the notch to get it to fit. Repeat with the other three bases.
Next we will cut notches in the plywood or particle board. {I would recommend particle board. It will make it a little sturdier. We had plywood laying around so I used that, but if I made them again, I'd use particle board}
In the bottom of the board you will cut out a notch that is 1 1/4" wide and 3 1/2" deep in the center of the board. At the top end of the board you will cut a notch that is 1" deep and 3 1/2" wide. The bottom of the board will be inserted on the bases. I had to trim these a bit to get them to fit. It's better to have a snug fit because it will be sturdier.
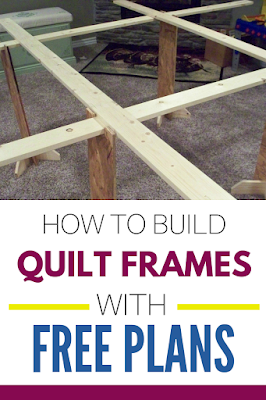
The top notch is for your quilting frames to sit in.
And there you have it. Just add clamps and tacks and you're ready to go.
It would be good to tack a heavy fabric to the top four boards and then pin your quilt or blanket to the fabric. So far, I haven't made anything besides baby blankets with it. Since they are completed so quickly, I haven't bothered to add my fabric strip. If you are actually hand quilting a quilt, then you would definitely want to pin your quilt to fabric as opposed to just tacking in onto the boards.


Having a frame like this would have been a boon for me in my quilting days - I gave up, because the big ones were just getting too heavy for me to cope with. Toys are much easier, and can use the scrap fabrics as well! Have missed your other posts on the subject because I've not been following my blogs as well as I should. Hope to do better, now that I've got a new computer! It is a whizzy thing: the other just crawled!
ReplyDeleteIsobel: www.ColdhamCuddliescalling.blogspot.com
Fun! I love quilting in the livingroom with my family (tying quilts anyway.... ) Good family time. I use my mother-in-law's frames, but when she wants them back, I will have to make my own!
ReplyDeleteThanks for this tut!
Have a HAPPY Easter... :)
hugs x
Crystelle
Crystelle Boutique
Thanks for sharing your quilting frame! A simple quilting frame is on my July project list.
ReplyDeletethanks for the plans, i like that the stands will stack flat for storage between quilts.
ReplyDeleteYou're welcome! I like that too.
DeleteMine keep wiggling what did I do wrong?
ReplyDeleteIf the bottom notch is cut too large that can cause wiggling. You could try wrapping a piece of cardboard or something similar around one or both sides of the notch to secure a snug fit.
Delete