

My 6 year old has been bugging me about having a bookshelf in her room for ages. All the other kids have one, so she felt left out.
I finally made one for her for her birthday. That was back in July - I'm just now getting to the tutorial.
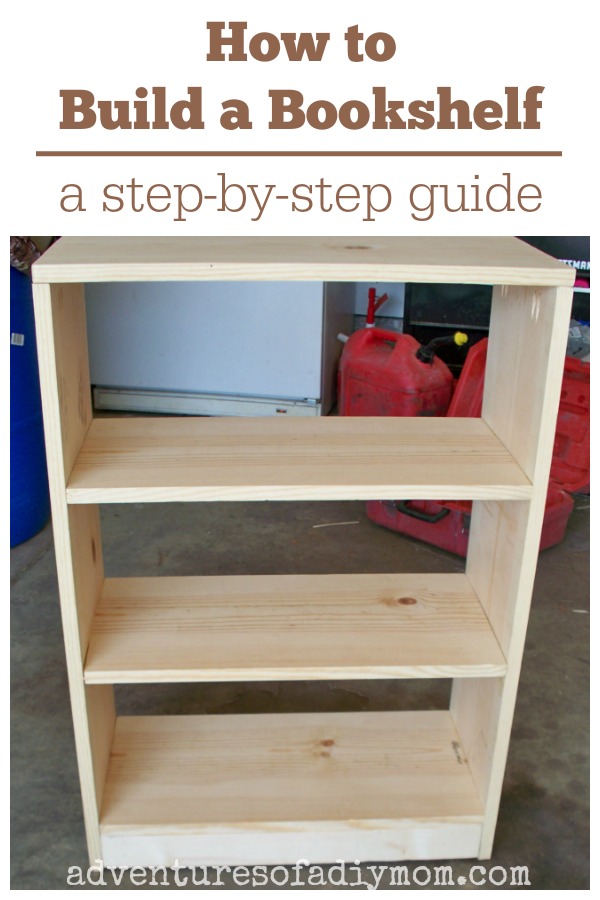
How to Build a Bookshelf
I actually built and painted it all on the 4th of July.
I know... I'm not a very exciting mom, but my daughter was at her cousins for the week and that's the only day I could do it and have it be a surprise.
Plus my husband was working, so other than a bbq that night we didn't have any fun plans.
It makes for a long day, but you can totally finish it all in one day.
This bookshelf is a variation of my son's bookshelf.
.jpg)
Supplies needed for a bookshelf:
- 2 - 1 X 12 boards 8' long
- 1 - 1 X 3 board
- 1 sheet 1/4" backing 24" X 48"
- 1 1/4" screws
- small finish nails
- wood glue
- primer
- paint
- measuring tape
- drill
- miter saw/circular saw/table saw
- kreg jig
- sandpaper
- pencil
Bookcase cut list:
2 sides - 1 X 12 @ 33 1/2"
1 top - 1 X 12 @24"
3 shelves - 1 X 12 @ 22 1/2"
1 back - 24" X 31 1/2"
1 footer - 1 X 3 @22 1/2"
Building the bookshelf
To begin, lets start by cutting our top and sides. You can get this out of one board..jpg)
Next drill your pocket holes into the top of both of your side boards.
I like to have a scrap of wafer board or something similar on the bottom of the jig so that my clamp doesn't dent up the wood.
I like to do four holes, two at each end.
.JPG)
Next attach the top to the sides using a little wood glue and screws.
It helps to have a extra pair of hands to help.
.JPG)
This is what it should look like so far.

Next cut your shelves out of your other 1 X 12. Then drill holes on both ends of each board.
.jpg)
Then start screwing them in place adding a little wood glue to the ends of the shelves.
If my measurements are correct there should be 9 1/2" between each shelf.
I basically measured, drew a line and then placed the shelf on the line.
I started with the bottom, then I did the top shelf and then the middle.
The spaces between each of the shelves didn't end up exactly the same, but they are straight so I guess that's good enough :)
.JPG)
Now it's time to add the footer. You'll want to measure your bookshelf.
It might be a little different than the cut list measurement.
Mine was slightly longer and I had to cut another.
Add two pocket holes to each end.
Add a little wood glue and screw in place.
.jpg)
.JPG)
Now all we need is to add the back. Just cut it to length.
I like to leave the space under the bottom shelf open in the back.
So if you're wondering why it doesn't cover all the way to the bottom that is why.
I decided to paint first then attach the back after. It just makes painting a little easier.
.JPG)
I painted the back white for a little contrast. And of course it had to be pink for my princess.
Does this look like something you could tackle? What color would you paint yours? Or would you stain it?


Very very nice work can Home Depot cut the pieces for you?
ReplyDeleteI bet they could. My store charges after two cuts, I think, but it's still very reasonable and so worth it if you don't have a saw.
DeleteVery very nice work can Home Depot cut the pieces for you?
ReplyDeleteHi! I came across this post on Pinterest. I'm trying to teach myself to build a bookcase, and today I'm learning about pocket holes. I'm using my dad's tools, and he said he doesn't have a jig, so I'm trying to decide if I need one or not. So I wanted to ask you, why did you made the pocket holes and screw from the inside, instead of just screwing straight from the outside of the sides, into the ends of the shelves?
ReplyDeleteMostly the reason I used the pocket holes was because they are less visible under the shelf than on the side. I love the jig and have used it for many different projects, however I'm all about using what you have and making it work. If you don't want to buy a jig then you can just screw them in from the side. I would recommend drilling a pilot hole first. {A pilot hole a bit smaller than the screw}. This will prevent the wood from splitting.
DeleteI'm gonna make one for my son tomorrow!! :-)
ReplyDeleteGood luck!
DeleteOH THANKS! I have grand ideas to build bookcases for my sewing room. :) I just bought a jkreg like kit from HarborFreight. Thanks for showing me how to place these. I am a seamstress (aka village idiot), so I figured, "I got this!" I have built several things and loved it. Swing bed, totally rocked this one, so I guess that a bookcase should be simpler. Thanks for the tutorial. Wish me luck! OH, forgot to say that I have slanted ceilings...that should make me scratch my head. LOL. :)
ReplyDeleteGood luck with your bookcase!!
DeleteHow much did this cost you to make?
ReplyDeleteHonestly, it was a long time ago and I don't remember. I would guess about $50-60 for the wood - maybe more if you need screws, nails and glue. A lot of times I will search the local lumber yard's website to calculate prices before starting a project.
DeleteDo you think that this bookshelf would be okay without the backing? I’d like to make the same kind but backless
ReplyDeleteYes, you can make this without the back. The backing doesn't really provide structural support so it will be fine without it.
DeleteThanks for sharing this project, Rachel! I'm hoping to build something like this to use as a linen shelf in my closet :) Can you tell me what type of wood you used/would recommend? The different categories at the hardware store make my head spin!
ReplyDeleteI used pine, it's the most common at my local hardware stores and generally the cheapest.
DeleteI'm definitely not an expert on the types of wood. I know pine is a "softer" wood and is not what most would pick if making an heirloom piece of furniture. But it works well for shelving and it's the most cost effective.
What type of paint did you use and how did you apply it? Also did you use primer? The finish looks very nice
ReplyDeleteI used leftover wall paint that was a two in one primer. I don't remember the specific brand.
Delete