Make your own herringbone quilt with this simple tutorial.
Using a jelly roll (2 1/2 inch strips of fabric), makes cutting the pieces so much easier. All you have to do is cut the strips at the correct angle and I show you a simple way to do that.
Using a jelly roll takes all the guesswork out of picking fabrics. All the fabrics are designed to go well together. There are so many options that you're sure to find one with your favorite colors.
EASY HERRINGBONE QUILT PATTERN
I made two herringbone quilts for my two youngest daughters. They each picked out a jellyroll that they liked and that would match their rooms.Years ago, I made them each a striped quilt. They have worn them out and it was time for something new.
Making a quilt is a big project. However, if you have all the supplies needed and spend a few hours each day, you could probably finish the entire quilt in a week or two.
I cut out and sewed together the tops for two quilts in about 4 days. Then they sat around unfinished because I hadn't bought the backing or batting.
Once I did, it took another 4-5 days to quilt them both. I added the binding and then came up short and had to wait for another order of fabric to finish the binding.
So the lesson? Get all the materials at the beginning and then you can just keep plugging along and not have to wait for orders of fabric to arrive.
The quilt has a fun zig zag edge that makes it unique. Be sure to scroll to the end to see both quilts.
↓ ↓ ↓ PIN IT ↓ ↓ ↓
↑ ↑ ↑ PIN IT ↑ ↑ ↑
This post may contain affiliate links. As an Amazon Associate I earn from qualifying purchases. Please see my full disclosure policy for details.
QUILTING SUPPLIES
Before we get started with this herringbone quilt tutorial you will need a few supplies.Below are some of my favorite quilting tools.
I always say make do with what you have, but for this project, I highly recommend getting a ruler that has 60 degree markings on it. It makes cutting the angles in the herringbone so much easier.
- fabric (find the specifics below)
- sewing machine
- pencil
- iron and ironing board
FABRIC REQUIREMENTS FOR AN OVERSIZED TWIN QUILT
Following these instructions will give you a quilt that is approximately 63 1/2" X 92". That is about 5 inches longer than a typical twin quilt. Adjust if desired.I used jelly rolls for this quilt. A jelly roll is a bundle of fabric that is precut into long 2 1/2 inch strips. This makes it really easy to cut all of the pieces for the quilt since half of the work is already done.
For more quilt patterns using jelly rolls check out this article. Or check out these EASY Quilt Patterns
Fabric needed:
- 1 jelly roll of assorted colors (Find 2 1/2" strips at Connecting Threads or Fat Quarter Shop)
- 1 white jelly roll OR 3 yards of white fabric cut into 2 1/2 inch strips
- batting
- 2 yards 108" quilt backing fabric OR 6 yards 43" fabric
- 1 1/4 yards 43" fabric for binding
HOW TO MAKE A HERRINGBONE QUILT
Making this herringbone quilt looks like it's difficult. But really it's just a matter of cutting the fabric strips in straight lines at the right angle and lining them up. It is a bit time consuming, but it's really pretty easy to make.I would rate this quilt between a beginner and and intermediate level. This might not be the best first quilt for a beginner quilter to try, but if you have the basics of sewing down, you can probably handle it. I'll walk you through it.
Let's get started.
There's also a video, so be sure to watch that for detailed instructions.
CUTTING THE FABRIC
You will need to cut 380 pieces of fabric.Each of these pieces are 2 1/2 inches wide and 8 inches from point to point.
Half of the pieces will be white and half are assorted colors.
Half of both the white and the assorted colors need to have a mirrored angle.
In other words you will need:
- 95 white pieces
- 95 white pieces with mirrored angle
- 95 assorted pieces
- 95 assorted pieces with mirrored angle
Begin by layering 5 long strips of fabric on top of each other.
Place them RIGHT SIDE UP in the corner of the cutting mat.
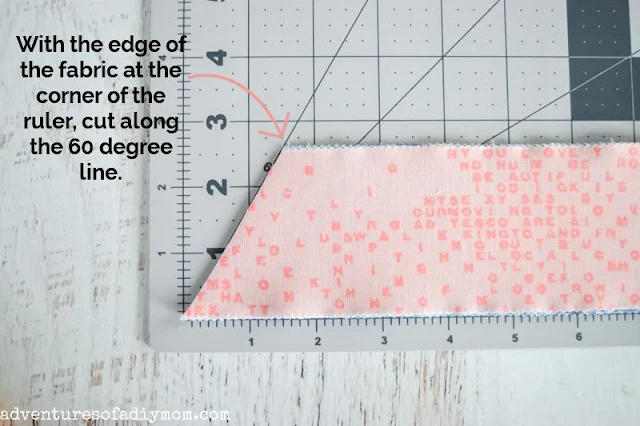
Using the 60 degree marking on the mat, cut off the end of the fabric.
The fabric strip needs to be 8 inches from point to point. The best way to accomplish this is to line up your ruler so that the 60 degree marking is vertical to the strip.
Place that marking on the 7 inch line. Move the ruler up or down so that the edge of the ruler lines up with the 8 inch tick mark at the bottom of the fabric.
Make your cut along the edge of the ruler. If you need more clarification, please watch the video, I go over the process several times.
Move the remaining fabric to the corner of the mat at repeat the process until you have 95 pieces of the assorted fabric and 95 pieces of the white fabric cut in this manner.
CUTTING THE MIRRORED ANGLE
The process for cutting the mirrored angle is exactly the same EXCEPT you begin with the fabric WRONG SIDE UP.Repeat the cutting process to make 95 assorted mirrored pieces and 95 white mirrored pieces.
LAYOUT THE PIECES IN A HERRINGBONE PATTERN
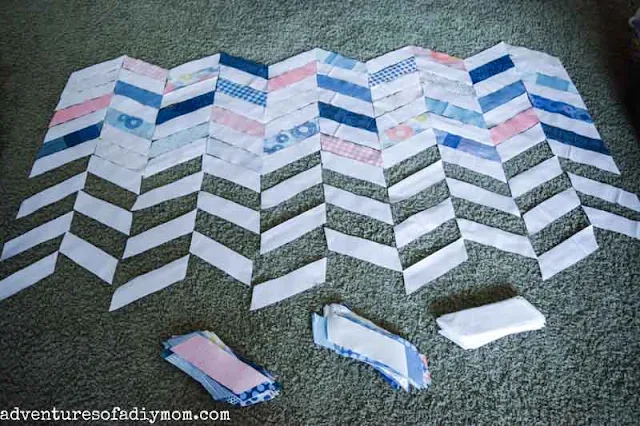
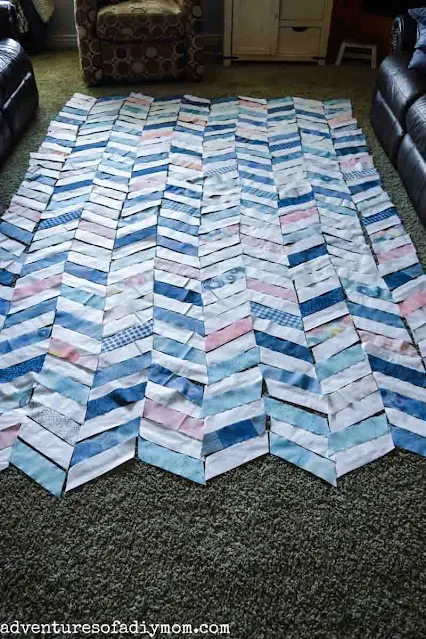
Once all the pieces have been cut out, the next step is to layout the quilt. The white strips should alternate with the colored pieces both vertically and horizontally.I found it easiest to layout several rows of white pieces and then fill in the colored pieces randomly. I tried not to have too many dark fabrics together or too many light colors together.
This will take a large area and quite a bit of time. I won't lie, it's tedious. I had my daughters help me.
Make 10 columns. Each column will have 38 pieces in it.
Once you have all the pieces where you like them, it's time to stack them up.
Beginning at the top, stack each piece on top of the one below it. With a small piece of paper, label each stack from right to left with the numbers 1-10. Pin the paper to the corresponding stack.
Criss cross the stacks on top of each other to keep everything together until ready to begin sewing.
SEWING TOGETHER THE STRIPS
Now it's time to start sewing together the strips to make a column. Select the first two pieces of fabric from the pile.(I like to keep the numbered paper on the fabric so I can keep track of which end is the top as well as what column I'm working on.)
Flip the bottom fabric upward, with right sides together. Both bottom corners should NOT line up, but should overlap 1/4 inch or so on both sides.
With 1/4 inch seam allowance sew a straight stitch along the bottom edge.
Repeat this process, sewing each strip in the pile to the bottom of the column. Once all of the strips in the column have been sewn together, press the seams on the back.
The seams should be pressed away from the white strips and toward the colored strips. Continue sewing the remaining columns.
SEWING THE COLUMNS TOGETHER
Once you have your columns sewn together, you can sew each column together.Stack two columns with right sides together. Line up and pin together each seam.
With a 1/4 inch seam allowance, sew together the columns, removing the pins as you go. Press the seam flat to either side. Repeat with the remaining columns.
FINISHING THE QUILT
Once all of the pieces for the top of the quilt have been sewn together, it's time to put it all together.Place the backing fabric wrong side down with the batting on top. (The backing and batting should be about 4 inches bigger on all sides.)
Then place the finished top on top. Pin evenly throughout the quilt to keep it all together. I opted to quilt it with my sewing machine using the stitch in the ditch method.
Basically, I sewed down each of the columns. Then I sewed along each of the zig zags. It took some time, but it was faster than hand quilting it and cheaper than having it taken to a quilt shop.
I think it makes the herringbone pattern pop being stitched in that way.
If you decide to quilt it yourself, be sure to invest in a walking foot that is compatible with your machine.
All that's left is to bind the raw edges. Be sure to check out my binding tutorial if you need to learn how to cut and sew a bias binding.
I also made a video of how I attach the binding with all those angled edges.
Want to watch the video? ↓↓Click the link ↓↓
Take a look at the finished quilts. Aren't they gorgeous? They were definitely worth it! Which is your favorite?
Don't forget to pin it!!


0 comments