Monday, September 24, 2012

Terrific Tuesdays #34

I am still going strong with my kids scrapbooks. My oldest daughter's is completely done. I completed a year of my son's. So I only have 3 years left for him.  I am in a groove and I'm not stopping until it's done.

So I will be taking a break this week {and maybe next} from blogging {Except for the link party}. My husband and son are going hunting/camping so it's the perfect time to focus completely on it. I will probably be making grilled cheese and ramen noodles for dinner each night. But the kids would rather have that anyway!  I'll check up next Tuesday and we'll see how far I got.

Now on to the party!

One of the most viewed links: {There was actually a 7 way tie, so I picked my favorite}
Caramel Milky Way Cookies by What's Cooking, Love?
These look super yummy! It's a perfect way to use up leftover Halloween candy too.

Some of my favorites this week:
Cinnamon French Toast Bake by The Recipe Critic
When I first saw this I immediately pinned it. It looks super yum! It's a must-try!

Girls Coat by While Wearing Heels
Can you believe this is the first item of clothing Amy has made? She did an amazing job! So cute!

Sanity Saving Training Pants by Sew Can Do
These are super cute. I won't say that I'm sad that I don't need to make any of these;) But I wish I had had some 6 months ago when I was potty training.


Check out my posts from last week. It was all about peaches:
Fruit Pizza
 Peach Tart
Canning Peaches
and

Now let's see all the terrific things you've been up to.
Here are my guidelines:
1. Link up any projects, crafts, or recipes you have blogged about recently. You can definitely link up several projects. No shops or link parties please.
2. Comment, comment, comment.  My vision for this link party is not to link and go. Please comment on two other links.
3. I'd love for you to follow my blog.{This is not required, but I’d love for you to take a minute and check it out.} Also if you're so inclined, you can follow me on facebook and pinterest as well.

4. Display my button somewhere on your blog - in the post, the sidebar, or on a party page.


Saturday, September 22, 2012

Easy Peach Cobbler

I shared this recipe last year, but it's good enough to share again.


This is the best and easiest peach cobbler you'll ever make.


Let me start by telling you that I've never been a fan of cobblers. At least not until I tried this recipe from my mother-in-law. I generally don't like all the biscuity crust. But this recipe is mostly the pudding part with a tad of sweet crust.  It is sooo good. I'm embarrassed to tell you this, but I usually eat most of the pan myself, since the kids don't really like it and my husband only likes it when it's hot out of the oven. 

To start with take a cube of butter and cut it into smaller chunks in a 9x13 pan. Place it in the oven while it is preheating.


While that is melting, get your peaches ready. 


I use my home canned peaches. You could definitely used store bought canned peaches, but I'm not sure if you'd need 1 or 2 large cans to equal a quart. Slice them up and set aside. **Make sure you save the juice** Sometimes I slice them before canning, which makes this recipe even easier.


Once your butter is melted add flour, baking powder, sugar and milk right into the pan and stir together with a whisk.


Add the peaches on top.


Then pour the juice on top. DO NOT STIR IT IN.


Bake at 400 for 35 minutes.


See how it's mostly pudding with just a little crust on top. It is absolutely divine!


I think it is best warm from the oven, because the crust is a little crispy. (You will have to let it cool a little, it will be boiling when you take it out.) But that doesn't stop me from eating leftovers for breakfast the next day. 
Click here for printable version.

Peach Cobbler Recipe


1 cube butter 
1 c. flour
2 t. baking powder
2 c. sugar
1 c. milk
1 quart peaches WITH juice

Melt butter in 9x13 pan while oven is preheating to 400.
Then whisk in flour, baking powder, sugar and milk. Then add peaches and juice on top. DO NOT STIR IN JUICE. Bake at 400 for 35 minutes. 


More Peach Recipes

Thursday, September 20, 2012

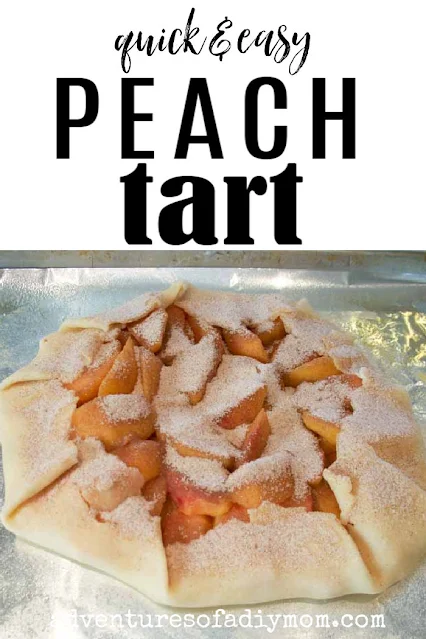
Peach Tart

Since peaches are in season right now, I'm devoting this week to all things peach.

Here's what I'll be sharing:
Fruit Pizza
Peach Tart
Canning Peaches
Peach Cobbler
Peaches and Cream
No-Bake Peach Dessert

 
I found this recipe among the junk mail. It was on a card with some coupons. It's super easy and tasty too. If you like peaches, give this a try. I'm sure you'll love it too.


Step 1 - Roll out pie crust. The recipe calls for a store bought pie crust. I'm too cheap to buy them, so I made my own pie crust. You can find my recipe here.

Step 2 - Mix together sugar and cinnamon.

Step 3 - Mix 1 T. cinnamon sugar with 4 oz. cream cheese

Step 4 - Spread cream cheese in center of pie crust, leaving about 2 inches around the outside.

Step 5 - Add sliced peaches that have been mixed with 1 T. cinnamon sugar.

Step 6 - Fold up edges of pie crust and sprinkle with remaining sugar. Then bake.


MORE PEACH RECIPES


peach tart

 
peach tart made with fresh peaches


Peach Tart

Peach Tart

Servings: 6
Author: Rachel Nielsen
Prep time: 10 MinCook time: 26 MinTotal time: 36 Min
An easy alternative to pie, try this peach tart!

Ingredients

  • 1 pie crust
  • 1/3 c. sugar
  • 1 t. cinnamon
  • 4 oz. cream cheese, softened
  • 2 large cups of fresh peaches, peeled & sliced.

Instructions

  1. Heat oven to 400. 
  2. Unroll pie crust onto foil-covered baking sheet sprayed with cooking spray. 
  3. Mix sugar and cinnamon
  4. Mix 1 tablespoon of cinnamon sugar with cream cheese. 
  5. Spread cream cheese mixture onto crust to within 2 inches of edge.
  6.  Toss peaches with 1 tablespoon of sugar mixture, spoon over cream cheese mixture.
  7. Fold edge of crust over peaches, leaving center uncovered.
  8. Sprinkle with reserved sugar mixture. 
  9. Bake 26 min. or until crust is golden brown and fruit juices are bubbly. 
  10. Cool slightly before removing tart from baking sheet. 
  11. Serve warm with ice cream, if desired.

Nutrition Facts

Calories

263.10

Fat (grams)

14.00

Sat. Fat (grams)

6.21

Carbs (grams)

32.44

Fiber (grams)

1.95

Net carbs

30.48

Sugar (grams)

17.72

Protein (grams)

3.38

Sodium (milligrams)

179.36

Cholesterol (grams)

19.09

Nutrition information is generated automatically and is not guaranteed to be correct.

Peach tart, peach dessert
Dessert
American

Monday, September 17, 2012

Terrific Tuesdays #33


I spent one day this weekend scrapbooking. Boy, do I have some catching up to do in that area. I got almost a full year done for my oldest daughter. Now I'm only 3 years behind on her book. The other kids each have 4 years to catch up on except the little one who is not quite 3 yet. 
I went the super easy route. Just grab a cute paper from the stack and slap the pictures on it. It's very simple, but I'm going to get it done. The biggest reason {besides having four kids} I got so far behind was because I kept thinking I should make them super cute with tons of embellishments. And I never had time {or money} for that. My kids love looking through the early years of their life, and they could care less what the page looks like, they just look at the pictures.

Enough about me...On to the party!

The most viewed link:

DIY Hot Air Balloons by The Consigner Designer
These are just gorgeous!

Some of my favorites this week:
Girl Boot Socks by Being Mom{me}Adorable! Go see how she made them.

Triple Chocolate Cupcakes by Pink Recipe Box
These look super yummy! I Love chocolate so these have to be good.

Flea Market Special by Shabby Gals
I'm lovin' the green accents. This is such a cute little table.

If you were featured grab a button!
Also check out my facebook page, I post additional features there from time to time.


Now let's see all the terrific things you've been up to.
Here are my guidelines:
1. Link up any projects, crafts, or recipes you have blogged about recently. You can definitely link up several projects. No shops or link parties please.
2. Comment, comment, comment.  My vision for this link party is not to link and go. Please comment on two other links.
3. I'd love for you to follow my blog.{This is not required, but I’d love for you to take a minute and check it out.} Also if you're so inclined, you can follow me on facebook and pinterest as well.

4. Display my button somewhere on your blog - in the post, the sidebar, or on a party page.

Friday, September 14, 2012

How to Make Raspberry Jam


One of my favorite kinds of jam is Raspberry! Since we grow our own raspberries, we always are able to make it very inexpensively.

Want to make your own batch of Raspberry Jam?

It's probably one of the easiest jams to make since all you need to do to prep your fruit is wash the berries, then mash them up a bit.

Before you start make sure you check out my canning tips


Step 1 - Place washed berries in a pot and mash them up a bit. {You need 4 c. of mashed berries}

Step 2 - Add 6 1/2 c. sugar, then mix well. Add 1 teaspoon butter or margarine to reduce foaming. {I forgot the butter this time, but it does make a difference.}

Step 3 - Get your pectin out and ready. {There are detailed instructions on how to can all kinds of jams enclosed with each box of pectin you buy.} I always buy the liquid pectin.

Step 4 - Bring your berry mixture to a boil. Add the pectin, stirring it in quickly. Then bring back to a boil and boil for 1 minute.

Step 5 - Remove from heat, then skim the foam from the top. Trust me you don't want to skip this step, I have before and the jam will have a nasty texture.

Step 6 - This is what it should look like, I've gotten most of the foam off.

Step 7 - Pour jam into jars.

Step 8 - Wipe off the rims with a clean damp washcloth or the lids may not seal.

Step 9 - Place lids and rings on jars.

Step 10 - Place in waterbath canner. Fill water 1-2 inches above jars. Bring to a boil and process 10 minutes, adjusting for altitude.

Step 11 - Remove and enjoy your jam.

Have more raspberries? Try this amazing fresh raspberry pie! You won't regret it! 

Thursday, September 13, 2012

5 Layer Oreo Dessert


I had to share one of my favorite summer desserts before summer is over. I found this in a Kraft Foods Magazine years ago. 


You have got to try this! It is so cool and refreshing on a hot summer {or fall} day. Another plus is that you don't need to turn your oven. 

I only make this once every summer, because I CANNOT stop eating it! It's that good. 


You may also like my No-Bake Oreo Cheesecake.


5 Layer Oreo Dessert

5 Layer Oreo Dessert

Servings: 18
Author: Rachel Nielsen
Prep time: 20 MinTotal time: 20 Min
A tasty refreshing oreo dessert, perfect for a warm day.

Ingredients

  • Layer one:
  • 35 Oreos, crushed
  • 6 T. butter, melted
  • Layer two:
  • 8 oz. cream cheese
  • 1/4 c. sugar
  • 2 T. cold milk
  • 1 1/4 c. whipped topping
  • Layer three:
  • 3 1/4 c. milk
  • 2 pkg. chocolate pudding
  • Layer four:
  • whipped topping (the rest of a 12 oz tub)
  • Layer five:
  • 3-4 Oreos, crushed

Instructions

  1. Crush 35 oreos. Mix with melted butter and then press into a 9 X 13 pan.
  2. Beat cream cheese and sugar until smooth. Add milk and whipped topping. Spread over oreo crust.
  3. Mix together chocolate pudding and milk and spread on cream cheese layer.
  4. Spread whipped topping on top.
  5. Sprinkle with crushed oreos.
  6. Refrigerate a few hours and enjoy!

Nutrition Facts

Calories

259.73

Fat (grams)

15.91

Sat. Fat (grams)

8.22

Carbs (grams)

27.54

Fiber (grams)

0.71

Net carbs

26.83

Sugar (grams)

16.49

Protein (grams)

3.44

Sodium (milligrams)

209.69

Cholesterol (grams)

26.70

Nutrition information is generated automatically and is not guaranteed to be correct.

oreo dessert,
Dessert
American

Wednesday, September 12, 2012

Magic Wands & Show Me a Story Giveaway!

Today I'm going to share with you a new book.  I received a copy of the book in exchange for my review. The book is called Show Me a Story by Emily K. Neuburger. Also, one lucky reader will win a copy of their own.

Show Me a Story
When I received the book in the mail, I immediately started looking through it. It's packed with fun activities and crafts for kids to do to encourage story telling. Most of the  projects can be made with things you probably already have in your home. All of the projects look very easy. There is a good mix of quick and longer activities to accommodate your schedule. 

I let my kids pick what they wanted to do first and they chose to make the Magic Fairy Wands.


I didn't follow the instructions exactly, but adjusted it to use what I had on hand.  We just happened to have some leftover dowel pieces that were just the right size. I let the girls pick the flowers they wanted and the ribbon they wanted.Then hot glued everything together. It was super fast and within five minutes they were playing with their magic wands.


Monday, September 10, 2012

Terrific Tuesdays #32

Thank you all for linking up each week. We had a great party last week.
This time of year is a busy time for me. As you may have guessed from my recent posts, I love canning. There is great satisfaction in preserving food for the coming months. I have a backlog of canning recipes to share with you. 

Now on to the party!

The most viewed link:
An Oops Makeover by Simply Vintageous
I love the shape of this little table and the distressed look.


Some of my favorites this week:
 Sweater Pumpkins by Alderberry Hill
These are just adorable.  I can't wait for fall.

The Getting Gathered Pillow Tutorial by Sew Can Do
This is gorgeous. Throw pillows have been on the to-do list forever. I've even had the fabric I want for over a year.

And my absolute favorite this week:
Free Purse Sewing Pattern by Crystelle Boutique
I have been wanting to make a handbag for a while. This is exactly what I imagined. And the best part is that her pattern is FREE! I printed it out right away. Now, as always, I just need to find time to make it.


Now let's see all the terrific things you've been up to.
Here are my guidelines:
1. Link up any projects, crafts, or recipes you have blogged about recently. You can definitely link up several projects. No shops or link parties please.
2. Comment, comment, comment.  My vision for this link party is not to link and go. Please comment on two other links.
3. I'd love for you to follow my blog.{This is not required, but I’d love for you to take a minute and check it out.} Also if you're so inclined, you can follow me on facebook and pinterest as well.

Friday, September 7, 2012

How to Make Fruit Roll Ups


Last year I canned Pear Sauce. I got some pears from a neighbor. My kids don't really care for pears, so I made pear sauce with the plan to make fruit roll ups. Well I finally got around to making them a couple months ago, and now I'm finally getting around to sharing it with you.

We'll start with the super easy pear roll ups first.


First spoon out pear sauce {or applesauce} onto fruit roll sheets that have been sprayed with cooking spray. Spread evenly. Dry at 130-140 until it is leather like and there are no sticky spots. This will take the better part of a day.  Peel it from the sheet and place onto wax paper. Roll up and cut into smaller pieces.These were pretty tasty. Way better than pears, in my opinion.

Want to try another flavor? We tried raspberry and strawberry. I must say I didn't care for the strawberry ones at all. But the raspberry ones are super yummy.


Place 2 pints raspberries in a blender. {I used frozen ones from our garden.} Add 2 cups applesauce {I used pear sauce} I also added a few spoonfuls of honey since raspberries tend to be tart.  Blend. Spread out evenly on greased fruit roll sheets. Dry at 130-140 for several hours. Remove from sheets and roll up in wax paper.

I want to try some blueberry flavored ones sometime. What flavor would you make?


Homemade Raspberry Fruit Roll Ups
Print

Homemade Raspberry Fruit Roll Ups

Servings: 24
Author: Rachel Nielsen
Prep time: 15 MCook time: 3 hourTotal time: 3 H & 15 M
Make your own fruit roll ups with fruit and applesauce.

Ingredients:

  • 2 pints raspberries
  • 2 c. applesauce
  • 2 T. honey

Instructions:

  1. Combine all ingredients in a blender.
  2. Blend until smooth.
  3. Spread out evenly onto greased fruit roll sheets.
  4. Dry in a dehydrator at 130-140 for several hours, until not sticky, but still pliable.
  5. Remove from sheets and roll up in wax paper.

Notes:

Make more flavors by substituting different fruits for the raspberries.

Calories

32.78

Fat (grams)

0.20

Sat. Fat (grams)

0.01

Carbs (grams)

8.13

Fiber (grams)

1.94

Net carbs

6.19

Sugar (grams)

5.59

Protein (grams)

0.35

Sodium (milligrams)

0.74

Cholesterol (grams)

0.00
Nutritional information is automatically generated and is not guaranteed to be correct.
homemade fruit roll up, raspberry fruit roll up
American
Created using The Recipes Generator

Thursday, September 6, 2012

Tomato ABC Soup

We've had tons of tomatoes from our garden. Here's one of the ways that I use them up. 


This is so yummy on a cold winter day! I just pour it in a pan and warm it up. To make it extra creamy you can add a can of tomato soup to it.

Want to make your own Tomato ABC Soup?

  I would consider this a more advanced canning recipe, just because of the equipment required.
You will need a pressure cooker and a food mill{unless you use store bought tomato juice, see below}. Also a food processor makes fast work of chopping the vegetables.

Be sure to check out my canning tips before starting as well.
  The first thing you need to do is chop up your onions, peppers, and celery. Using a food processor makes it super quick to chop the veggies.  Place them in a pan and cover with water. Bring to a boil and simmer 20 minutes or until veggies are tender. Drain the water.

While that is cooking, start working on your tomatoes. Start by boiling your tomatoes a few minutes, until the skins start to split. Pour them into a food mill to extract the juice. Keep repeating this with all your tomatoes.

The recipe calls for 9 qts of juice. I didn't have enough tomatoes to make that much juice, so I bought some canned juice to add to it. If you don't have a food mill, you could just make it with canned juice. It would also be way less messy!

Once your tomato juice is ready, place in a pan with sugar, salt and pepper. Bring to a boil and add veggies and bring to a boil. Then add noodles and margarine. Cook until noodles are almost done.

Prepare your jars by placing 1 T. lemon juice in each pint or 2 T. in each quart. Then pour tomato soup to fill.

Pressure cook at 10 pounds pressure for 20 minutes.


Click here for printable version 

Tomato ABC Soup Recipe{from my mom} 

3 large onions
3 green peppers
1 bunch celery
1/2 bushel tomatoes, juiced {need 9 quarts of juice}
1/8 c. salt
1 c. sugar
3/4 - 1 t. pepper
1 pkg abc macaroni noodles
1/2 c. margarine
lemon juice

Chop onions, peppers and celery and place in a pan. Cover with water and boil until veggies are tender {about 20 minutes}.
Place tomato juice, salt, sugar and pepper in pan and bring to a boil. Add drained veggies. Add ABC noodles and margarine. Cook until noodles are almost done, stirring occasionally.
 Prepare jars by placing 1 T. per pint or 2 T. per quart of lemon juice into each jar.
Fill jars with soup. Pressure cook at 10 pounds pressure for 20 minutes.  Makes approx. 23 pints.