Thursday, June 27, 2013

From the Archives - Bead Board Flag and Stars

For those of you who are new: In an attempt to be able to spend more time with my kids for the summer, and not too much time on the computer, I'm sharing something from my first year of blogging each week. I'll just have a picture or two and direct you to the original post for the tutorial.


One of my favorite 4th of July decorations is my bead board flag and stars.

 This was pretty easy to make. If you want to make your own be sure to check out my tutorial here

While I'm at it, I'll share another wood flag decoration I've made following this tutorial. You can find my original post here.


Do you decorate for the 4th? I was going to bring up the decorations yesterday, but I didn't get around to it. I hope I get to it today.


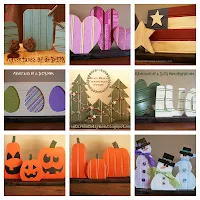
You may also like my other beadboard projects:
Menu Board
Bead Board Picture Frames 
Bead Board Hearts
Bead Board Flag and Stars 
Bead Board Easter Eggs 
Bead Board St. Patrick's Day Decor 
Reversible Bead Board Pumpkins
Bead Board Snowmen


Wednesday, June 26, 2013

DIY Chalkboard, Beadboard, Menu Board


Today I am so excited to show you my new menu board. It is made from bead board and painted with chalkboard paint.

DIY Chalkboard Beadboard Menuboard
Want to make your own?


Here's what you need:
An old frame - {the opening on mine was 9 1/2 by 12 1/2}
Bead board - I used scraps from when we finished our kitchenette in the basement
Chalkboard Paint
Regular paint - for the frame, I just used a small bottle of acrylic paint.
Vinyl letters - I used my silhouette to cut them out.
Jigsaw

How to Build Chalkboard Beadboard Menuboard
Step 1 - gather your supplies. I had these short pieces of bead board that I kept from when we finished the basement. I had no idea what I would use them for, but I knew that eventually I would use them. They worked perfectly for this project. I was happy to find this frame that fit 7 "rows" of the beadboard so I could use one for each day.

Step 2 - Stick the bead board in the frame and mark where you need to cut.

Step 3 - Cut the beadboard with the jigsaw. Make sure it fits in the frame. A couple of mine I had to trim a tiny bit more.

Step 4 - Using your first piece, mark the other boards. Then cut them.

Step 5 - Depending on your frame, you will probably need to cut your last piece long ways as well. I placed it in the frame and marked it as best I could. Then cut it with the jigsaw as well.

Step 6 - Place all the pieces in the frame to make sure they all fit.

Step 7 - I guess this isn't really a step, I just wanted to show you what it looked like from the front.

Now it's time to paint....


Lullaby Paints


How to Build Chalkboard Beadboard Menuboard


I just realized that I should have started at step 8, not 1 again. Oh, well... Too much work to relabel the picture. You guys understand, right?

Step 1 - take your bead board out of your frame and paint it with the chalkboard paint. Let dry and add a second coat.

Step 2 - once paint is thoroughly dry, rub it with the side of a piece of chalk.

Step 3 - wipe off the chalk - the box said to avoid excessive chalkdust to clean with a damp cloth. I'm not sure if you can do that with regular chalkboard paint.

Step 4 - Paint your frame.

Step 6 -  Sand down the edges if you want a worn look.

Step 7 - Add your vinyl lettering.

{I was worried about the vinyl sticking to a lot of chalk residue, until I read that I could wipe it down with a damp cloth. If you end up using a different chalkboard paint, you may want to add the vinyl before you rub it down with chalk.}

Chalkboard Beadboard Menuboard

And yes, this is what we will be having for dinner this week. I always wonder about that when I see menu boards. Do they just make up stuff that sounds good? or Are they actually going to be making it?
DIY Chalkboard Beadboard Menuboard

You may remember that I'm a little scared of color.  I was worried about the green. It's kind of bold. But I ended up loving it. So much that I quickly painted my little mason jar that holds all my measuring spoons. I used the same process to paint the jar as I did here. I may even repaint a few other things in the kitchen.


This is the longest post I've written in a long time. If you've made it this far, I'd love to know what you think about my new menu board?


You may also like my other beadboard projects:

Bead Board Picture Frames 
Bead Board Hearts
Bead Board Flag and Stars 
Bead Board Easter Eggs 
Bead Board St. Patrick's Day Decor 
Reversible Bead Board Pumpkins
Bead Board Snowmen
 

Monday, June 24, 2013

Terrific Tuesdays #69


It's been a busy day so there are no features today. I went grocery shopping for the month and that took all morning. Then of course it takes a couple hours to put it all away. Then I walked in to my 3 year old's room and I just couldn't take the mess anymore. So I started cleaning it up - I ended up going through everything and spent a few more hours cleaning not only her room, but the basement as well. I really need to be better about making sure they clean up their rooms EVERY day. It's so much easier for them if the mess is smaller.

 Anyway... On to the party!


Now let's see all the terrific things you've been up to.

1. Link up!  No shops, or link parties please.

2. Comment, comment, comment

3. Grab my button or add a text link.

Thursday, June 20, 2013

From the Archives - Sew-It-Yourself Shoe Organizer Tutorial

This was a post from my very first month of blogging. It's one of those things that I still use - although it works better for my two youngest kids shoes, since my older two are getting so big.

Want to make your own?

Check out my original tutorial: Sew It Yourself - Shoe Organizer


The tutorial is for kids shoes. I had a question about an adult sized organizer. In the comments of my original post, I've shared a cut list for an adult sized shoe organizer. As far as I know, it has not been tested, but if you try it I'd love to know if the measurements are accurate.

One thing I would warn you of, is the sticky backed hooks that I used in the tutorial didn't last. After a few months they started falling off.  I ended up buying two over the door hooks and with the dowel in the top it works just fine.


How do you keep your shoes organized?


Wednesday, June 19, 2013

Framed Pin Cushion

Today I'm going to show you how to make super easy and cute pin cushion.

A few weeks back, I shared my the frames I got at a yard sale and repainted. I hung them all except this one. I'd seen a pin cushion similar to this forever ago and wanted to try my hand at it.


To begin you will need a frame, a scrap of fabric, a little fiber fill, and a hot glue gun.


Since my frame didn't come with a back, I cut out a piece of stiff cardboard to fit the opening. Next, I placed the fabric down in the frame, then added a little fiberfill and finally the cardboard. I just fiddled around with it until it looked the way I wanted it to look. Then I placed a bead of hot glue down the side of the inside corner of the frame. {Where the picture and back would go} Then I quickly placed the fabric over the hot glue. Working my way around the frame, I repeated this until all four sides were glued down.

This was definitely a "figure it out as I go" project. I didn't have enough hands to take more pictures of the process, but I'll be happy to answer any questions you may have. 


Then I hot glued the excess fabric onto the back of the cardboard.


 My next problem, was that I wanted it to sit at my sewing table. But without a back it would just tip over. Then I remembered these clear frames I had in my frame box. {I know you're thinking, who has a frame box?} So I just hot glued it to the back and it works like a charm.


You can kind of see it through the holes the front, but since it's clear it's not too noticeable.


A view of the side...


And here it is sitting on my sewing table. I haven't sewn anything since I've made the pin cushion, but I know I will be using it a LOT.


Oh yeah.... and see that can in the background? That's my little thread garbage can. I just spray painted a tomato juice can, then sanded it down a bit.  For years, I'd make a little pile of thread next to the sewing machine. Then when the fabric would get near it it would get spread everywhere. Now I can easily stick it in the can and my work area stays nice and tidy.


Monday, June 17, 2013

Terrific Tuesdays #68


My favorites from last week:

Best Ever Strawberry Creamcheese Breakfast Cake by VMG206

70 + free Sewing Tutorials by Creating my way to Success.


Now let's see all the terrific things you've been up to.

1. Link up!  No shops, or link parties please.

2. Comment, comment, comment

3. Grab my button or add a text link.


Thursday, June 13, 2013

From The Archives: Tapioca Pudding

I don't want to spend all summer on the computer. My kids are still young and I want to do fun things with them. At the same time, I don't want the blog to sit with nothing new.

My solution: Go through the archives and share some of my favorite projects from my first year of blogging. It won't necessarily be new content, but most of you weren't around way back then, so it will seem new.

I will also try to post one new project each week as well.

So here we go:

Tapioca Pudding! I absolutely love the stuff. There is something about the creamy pudding with the little pearls of tapioca....I'm wishing I had a bowl right now. It's actually one of the better-for-you desserts that I make. As long as you remember portion control, which I usually don't.


Here's the recipe, if you want a step by step, please see my original Tapioca Pudding post.
For a printable version, click here.

Tapioca Pudding
 1/2 . small pearl tapioca (not instant)
3 c. whole milk
1/4 t. salt
2 eggs
3/4 c. sugar
1 t. vanilla

Soak tapioca overnight. Combine tapioca, milk and salt in a pot. Stir until boiling. Simmer 5 minutes on low heat, adding sugar gradually. Beat eggs in a separate bowl. Mix in some of the tapioca mixture into the eggs. Then add to pan and bring to a boil, stirring constantly. Simmer until thick. Cool 15 minutes. Add vanilla.


I'm nowhere near perfect, but I've come a long way with my photo's don't you think? Go check out the original post to see the difference. {I won't be re-doing all the pictures, but I just happened to make this recently.}


Wednesday, June 12, 2013

Painted Mason Jars


These cute mason jars are easy to whip up. I had everything on hand already so there was no out of pocket expense.
I may have to buy a new box of pint jars when canning season comes around though :)

I love how the details pop out. 


You may remember that I featured some similar mason jars a few months back. Since I loved them so much I made myself some.

Head over to A Mommy's Life with a Touch of Yellow to find a fantastic tutorial.

I feel no need to make another tutorial. I pretty much followed Whitney's exactly. The only thing I did differently was to use chalkboard spray paint instead of regular chalkboard paint, because that's what I had.


Monday, June 10, 2013

Terrific Tuesdays #67


My favorites from last week:


How to Make a Trifle by Ashley's Dandelion Wishes


Strawberry Tart by Nap-time Creations.


Now let's see all the terrific things you've been up to.

1. Link up!  No shops, or link parties please.

2. Comment, comment, comment

3. Grab my button or add a text link.


Monday, June 3, 2013

Terrific Tuesdays #66


I didn't have time to pick features this week. I have a few projects to share, but I probably won't have time to get them typed up this week.


Now let's see all the terrific things you've been up to.

1. Link up!  No shops, or link parties please.

2. Comment, comment, comment

3. Grab my button or add a text link.