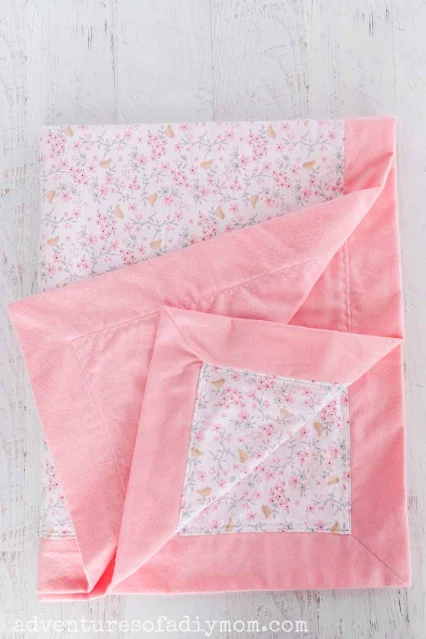
Learn how to make a baby blanket with a self binding border. Homemade blankets make great gifts for new babies.
This DIY will show you step-by-step how to create a mitered corner blanket the EASY way. It's a great little trick to have up your sleeve and a simple project for beginners as well.Blanket bindings are always the most annoying part of making a blanket. At least they were until I learned the self binding method.
The way it works is that the back wraps toward the front creating the binding. Sewing it together in a certain way means that once you flip it right side out, the binding is already complete! It's magic!
A quick topstitch around the border to enclose the opening and you're done.
I've made several baby blankets over the years, but I think this one is my new favorite!
Some of my old favorites include a DIY receiving blanket, a very easy blanket with a surged edge, and a striped ragtop blanket.
Of course, if you're making baby blankets, you'll probably want to make some matching burp cloths. Try the coordinating sewed burp rags, the surged burp rags or the ragtop burp cloths.
Coming soon, I plan to make a bordered burp cloth to match this blanket.
HOW TO MAKE A BABY BLANKET
This post may contain affiliate links. As an Amazon Associate I earn from qualifying purchases. Please see my full disclosure policy for details.SUPPLIES NEEDED FOR A DIY BABY BLANKET
- Fabric - I prefer flannel, but see my list at the end of the article for other fabric options
- 7/8 yard for top
- 1 1/3 - 1 1/2 yard for bottom depending on size, see below.
- thread
- cutting mat / rotary cutter
- straight edge ruler
- scissors
- point turner
- sewing machine
- pencil
FABRIC CUT LIST FOR BABY BLANKET WITH MITERED CORNERS
The basic premise of the self-binding blanket is that the back piece folds forward and becomes the binding.Depending on how thick you want the binding to be determines how large your back should be. An easy rule of thumb is to add 10 inches to the top fabric measurement.
The fabric will overhang 5 inches on all sides.
Once folded towards the front this will create a border that is 2 1/2 inches. For example, if my top piece of fabric is 30" X 40", adding 10 inches means that my back piece should be 40" X 50".
You can make smaller borders too, just add a smaller number. You can figure out the math for specific sized blankets, or you can use the measurements I came up with.
I made two flannel baby blankets, one with a larger 2 1/2 inch border, and one with a smaller 1 1/2 inch border.
2 1/2 inch border - Add 10 inches
Top fabric 30" X 40"Bottom fabric 40" X 50"
Finished size: approx. 34" X 44"
1 1/2 inch border - Add 6 inches
Top fabric 30" X 40"Bottom fabric 36" X 46"
Finished size: approx. 32 1/2" X 42 1/2"
HOW TO MAKE A BLANKET
Learn better by watching? Check out the video tutorial! Begin by cutting out the fabric to the dimensions shown above.Pinning and sewing the blanket
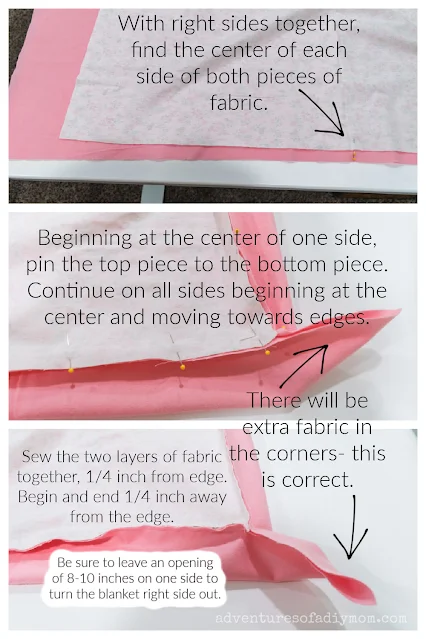
Next find the center of each side of both pieces of fabric. Mark the centers with a pin.
Place the bottom fabric right side up, and the top fabric right side down on your working surface.
Beginning on one side, pin together the two fabrics. Begin in the center and work your way towards the edge. Continue pinning the top to the bottom on all four sides.
There will be some extra at the corners. Don't worry, this is what is supposed to happen.
Now it's time to sew the top to the bottom.
Beginning in the middle of one side, sew 1/4 inch away from the edge using a straight stitch. Stop sewing 1/4 inch from the end!
This is important and is what helps create the mitered corners.
Turn the blanket and begin sewing the next side. Start sewing 1/4 inch from the end, and end 1/4 inch from the opposite end.
Continue around the entire blanket.
When you get to the side you started on, make sure you stop sewing about 8-10 inches from where you started.
This will leave an opening to turn the blanket right side out.
Sewing the mitered corners
Before we turn the blanket right side out, we need to make our mitered corners.Begin by folding together the edges of the blanket to form a point in the corner. Smooth out the fabric to create a triangle in the corner of the blanket.
Next place a straight edge along the folded edge of the corner. Place the side of the ruler so that the stitching line is right up next to it and draw a line with a pencil.
Sew along the line.
Trim 1/4 inch away from the stitched line on the point side of the seam. Repeat this process for all four corners.
Finishing the baby blanket
Turn the blanket right side out. Use a point turner or pencil to get nice pointy corners.Press the blanket so it's nice and flat.
Sew all the way around the blanket along the edge of the top fabric.
Pay specific attention to the opening, being sure to catch both the top and the border fabric in the stitching.
I used a running zigzag stitch because I liked how it looked. I found that it didn't quite close up the opening, so I went over it again with a straight stitch closer to the edge.
I like how the decorative stitch looks, but if you only want to go around once, I would recommend the straight stitch.
Below are the two blankets I made. The grey one has a 1 1/2 inch border. The pink one has a 2 1/2 inch border.
Want to watch the video? ↓↓Click the link ↓↓
Here's another version I made my son for Christmas. I ordered a blanket with pictures of his dog. The fleece was so thin, so I decided to back it with additional fleece using this method.BLANKET FABRIC
You really can use whatever type of fabric you would like for a baby blanket. Here are a few options.- flannel
- minky / plush fabric
- cotton
- fleece
- gauze fabric (think swaddle blankets)
Flannel
I love using flannel for baby blankets. It's my go-to. It's soft, comes in lots of patterns and colors and is inexpensive. It's also great for beginners because it is easy to sew with.Minky
Minky fabric is SO soft and perfect for cuddling up. Minky blankets are the ones that get fought over at our house.Because the fabric is so soft and slippery, it can be a little hard to work with. Make sure you use lots of pins to keep in place as you sew.
Minky fabric is usually 57-60 inches wide. Below are the measurements needed for a baby blanket using these wide fabrics.
Top fabric - 7/8 yards
Bottom fabric - 1 1/4 yards
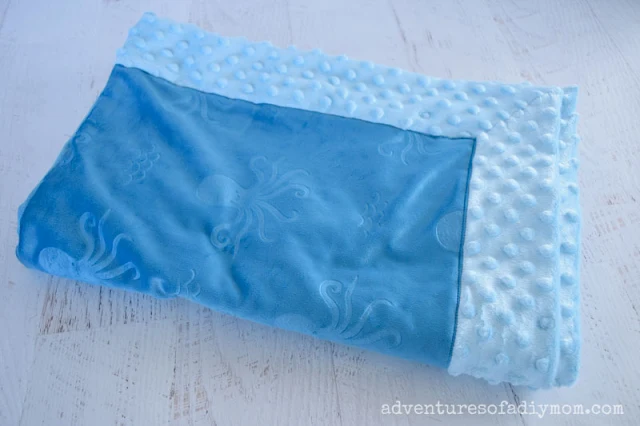
This blue baby blanket I whipped up for a baby shower gift. It seems that handmade baby blankets are a hit! I personally don't love sewing with minky, but the results are worth it.
Cotton
Cotton fabric is a great option for summer blankets because it's light weight. Sometimes you just want a light covering. Of course, you can always add a layer of batting for a warmer blanket.Fleece
Fleece is most commonly used to make no-sew blankets. I have not tried making a self-binding blanket with fleece.In theory, the concept should work. But I wonder if the thickness of the fleece would cause the seam to be bulky. I'd appreciate any feedback if you've used fleece for a self-binding blanket.
Update: I have now used this method with fleece. It worked ok, but it's not my favorite fabric to work with for this blanket.
Gauze fabric
Gauze fabric is generally used to make swaddle baby blankets. It's soft and drapes easily. I have not used gauze fabric before, and don't know how easy or difficult it would be to use for this application.MORE BLANKET TUTORIALS
- Easy Striped Quilt
- Tie Quilt Blanket
- Easy Crochet Blanket
- How to Wash a Fleece Blanket
- How to Make a Blanket {30 different ways}
- 40+ Jelly Roll Quilts
- Puff Quilt
- Baby Boy Quilts
- Baby Quilts
- Baby Girl Quilts
- Crochet Baby Blankets
Don't forget to pin it!!


cute blanket. great video. I have a question. since there isn't any stitching in the middle part of the blanket, when you wash it, does it come out of the wash/dryer a big ball? hard to explain what I mean but the blanket won't be attached front and back since just the edges are sewed together.
ReplyDeleteYes, I understand what you mean and wondered the same thing. Surprisingly the two layers stay together fairly well when washed and dried. The layers can get slightly off kilter, but a quick shake and they will fall back in place. (I will disclose that I've only washed and dried this type of blanket once, since I don't have little ones anymore and just make them for gifts.)
DeleteIf you decide to add a layer of batting, then I would for sure add some tie quilting or machine quilting to keep the layers in place and prevent the batting from bunching up.