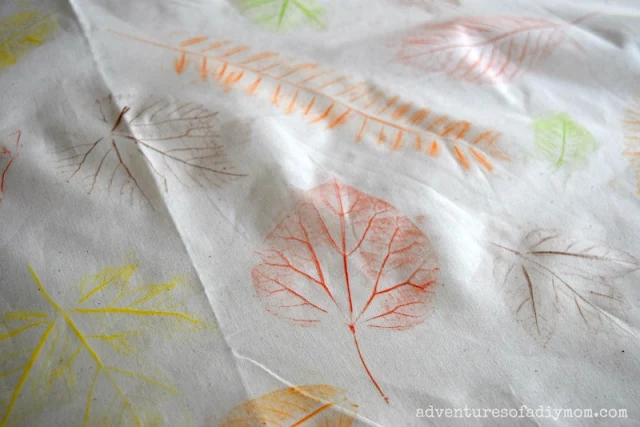
Did you ever do leaf rubbing as a kid? I vaguely remember doing it.
When trying to come up with a project for this month's challenge (leaves), I remembered doing leaf rubbing art.
But I wanted a new twist.
I came up with the idea to do the leaf rubbing on fabric and then creating a pillow.
Fall Leaf Rubbing Pillow - a twist on a classic fall activity
You guys, these were so fun and so easy! I used my basic envelope pillow pattern {remember the fun spring pillows?}, gathered some leaves, and created some fun leaf rubbed pillows.My 8 and 11 year old's were in the thick of things as they helped gather leaves and do the rubbing.
Supplies needed for a leaf rubbed pillow
leavesfabric
crayons
sewing machine/thread/scissors
a pillow to cover
Before we get into the leaf rubbing, we need to get our fabric ready. I suggest cutting the fabric to the right size. The pillows I was covering were 16" X 16", so I cut the fabric to 16" X 38". Then I folded and sewed the short ends. We'll sew it into a pillow after we add the leaf details.
Please refer back to my easy envelope pillow cover post for the details of how to create a custom sized pillow cover.
Let's talk about the leaves for a minute. They need to be fresh leaves. Not ones you find on the ground and are dry and brittle. Not ones that you picked two days ago, but haven't done your project yet {pointing at myself}. The leaves need to be soft and pliable.
For the best results, place the leaves upside down. That way you are rubbing the "veins" of the leaves and will ensure the best result.
Add your fabric on top of the leaves. Hold it firmly in place while you rub over the leaf with the side of a crayon. This was the part that was the most frustrating. The fabric easily moves and if you're not finished with that leaf, it is impossible to line it up right again.
The best tip I can give is to press firmly as you rub, to avoid having to go over the leaf again.
We found that when using a whole crayon, it was too long and created extra drawing outside the leaf. We broke the crayons in half and that helped a ton.
If I were to do these again, I would not use yellow or green, they were just too light and it's hard to see the detail unless you're very close.
The best leaves to rub are the ones with thick "veins". Grape leaves and maple leaves were some of our favorites.
Once the rubbing is done, finish sewing together your pillow cover. {See envelope pillow post for details}
Tips for Leaf Rubbing Crafts
- Use fresh leaves - old leaves are dry and brittle
- Make sure leaf is upside down, for the best results
- Hold the fabric firmly as you rub to prevent the fabric from moving
- Press firmly as you rub - that way you won't have to go over it again and possibly mess it up
- Use darker colored crayons - the yellow and green were too light and hard to see from a distance.
- Use half of a crayon to prevent excess markings outside the leaf
This project has been featured at Fave Crafts and the DIY Idea Center! They have tons of fall projects.
You may also like these pillow covers made with decorative dish towels or a DIY embroidered pillow.
More Fall Crafts:
- Indian corn fall decor
- Wood sign with cardboard pumpkins
- Flower and pine cone wreath
- Pine cone flowers
- Toilet paper pumpkins
- 75+ fall crafts
More Throw Pillow Ideas:
- Easy envelope pillow
- Pillow cover from a dish towel
- Pillow covers using cloth napkins
- How to dye a pillow


.jpg)

Wow! I never thought of doing this classic on fabric. Great Idea, I love the look!!
ReplyDeleteVery fun and great activity for kids to try. Visiting from Inspire My Creativity.
ReplyDeleteThese are BEAUTIFUL!! What a great idea!
ReplyDeleteI remember leaf rubbing as a kid and this is a great way to do leaf rubbing and create a keepsake. Adorable!
ReplyDeleteI need to try leaf rubbing with my kiddos. What a fun fall project! Your pillows turned out so cute!
ReplyDeleteThe pillow cover turned out sooo pretty!!
ReplyDeleteThis is so pretty and unique! Thanks so much for sharing at this week's Project Inspire{d}.
ReplyDeleteThese came out so cute!! I remember doing that as a kid, how fun!
ReplyDeleteI do remember doing this as a child. The pillow turned out so fantastic.
ReplyDeleteI remember doing this with paper when I was a kid. I never tried it with fabric. but it's a great idea.
ReplyDeleteThank you for sharing at The Really Crafty link Party. Pinned.
What a creative idea! I love how these turned out. I want to make some too!
ReplyDeleteSuch a pretty pillow! My boys and I have done leaf rubbings a few times but I would never have thought to try it with fabric. That's genius! Pinned.
ReplyDeleteNo way! I used to love doing leaf rubbings when I was a child. I would have never thought to do it on fabric!
ReplyDelete