Wax cord bracelets are so fun to make and stylish to wear. These bracelets are inspired by the popular Pura Vida bracelets.
Find out how to make your own. They are inexpensive and easy to make.
Keep reading for instructions for 4 different types of adjustable bracelets!
HOW TO MAKE A WAX CORD BRACELET (A PURA VIDA INSPIRED DIY)
This spring, we had a family get together. My nieces had a bunch of these DIY Pura Vida bracelets they had made at a youth activity.
Since I was in charge of our girls camp crafts, I asked them how to make them. It turns out they're pretty easy and it's fun to come up with variations.
These stackable bracelets were a hit with our young women's group. A few girls even went home and bought their own wax cord to make even more.
And we did another activity after camp (at their request) to make even more colorful string bracelets.
This is a great DIY gift idea! Since the handcrafted bracelets are adjustable, they will fit any sized wrist.
I've put together instructions, step-by-step pictures and videos of how to make each of 4 different kinds of bracelets.
To quickly navigate to different sections of the article, use the quick links below.
- Supply list
- String bracelet tutorial
- Twisting the bracelet ends
- Making the adjustable sliding knot
- Braided bracelet tutorial
- Bracelet with connecting charms tutorial
- Bracelet with words or phrases tutorial
- Free printable instructions
This post may contain affiliate links. As an Amazon Associate I earn from qualifying purchases. Please see my full disclosure policy for details.
SUPPLIES NEEDED DIY PURA VIDA BRACELETS
- 1mm wax cord
- scissors
- lighter / candle
- charms, optional
- letter beads, optional
- connecting charms, optional
- Free printable instructions (available at the end of the post)
This wax string pack comes in 40 different colors for endless color combinations.
HOW TO MAKE WAX STRING BRACELETS
Let's get started with the basic string bracelet. Once you master these, you can easily make the other styles of bracelets and even come up with your own variations.Here's the link to the video:
→Wax String Bracelet Video←
Tying the wax thread to form a bracelet
- Cut 9 strings 6 inches long. Cut 3 strings 9 inches long.
- Gather all of the 6 inch strings together and tie one end with a 9 inch string.
- Flip the bracelet over and tie a double knot on the back side.
- Clip the strings about 1/4 inch from the knot. Using a lighter, melt the strands together to prevent unraveling
- Repeat with the other end of the strings.
Twisting the tails of the bracelet
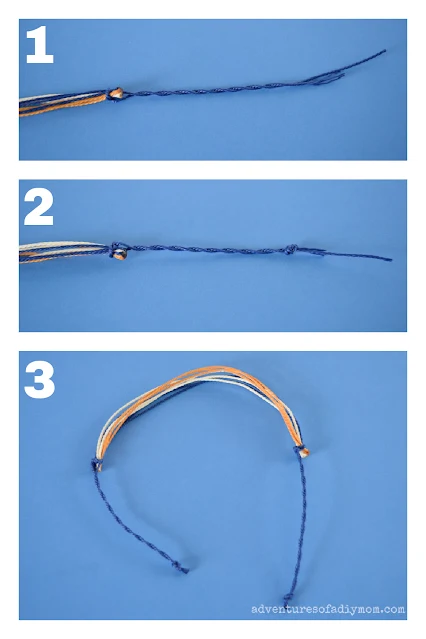
Twisting the bracelet end and making the closure knot is the same for ALL the bracelets. To avoid repeating myself and typing these instructions over and over, please refer to this section to finish off your bracelets.This is kind of hard to explain, so I suggest watching the video if you need clarification.Begin on one end of the bracelet. Twist one string so the strand becomes tighter and tighter (about 4-6 twists).
While keeping hold of the first string, twist the second string in the same manner. I use my middle and ring finger to hold it, while using my thumbs and pointer fingers to twist the second strand. Or have someone help you hold it.
Hold both of the twisted strands from the untied end and let the rest of the bracelet dangle. This will cause the strands to twist around each other.
Tie a knot in the end. Clip and melt the ends.
Repeat with the other side of the bracelet.
Make an adjustable sliding knot
Again, I will do my best to explain how to make the sliding knot. You can watch the video to see how it's done.You can see a nice graphic depicting how the knots are made here. Scroll down to the Square Knot image.
Use this same knot to finish off ALL of the different types of bracelets.
- Tie the remaining 9 inch string around the twisted ends of the bracelet. Try to have an even amount of string on both sides of the knot.
- Loop the left string over the bracelet
- Place the right string on top of the left string.
- Then slide the right string behind the twisted strands.
- Insert the right strand up through the hole in the loop on the left side.
- Pull both ends of the string to tighten.
- Place the string on the right side over the bracelet.
- Take the string on the left and place it on top of the right string
- Place the string under the bracelet
- Then up through the loop on the right side.
- Tighten the knot.
Tip: Tighten the knot until it is snug, but don't tighten too tight. You want it to be able to slide and adjust.
HOW TO MAKE WAX CORD BRAIDED BRACELETS
My favorite is the braided bracelet. Using the wax cord really helps the braid to lay nice and flat. Make it your own by using your favorite colors.It could be fun mix it up and have one of each color in each strand of the braid.
→Wax Cord Braided Bracelet Video←
- Cut 9 strings 7 inches long. Cut 3 strings 9 inches long.
- Gather all of the 7 inch strings and tie a 9 inch string around one end. Turn the bracelet over and tie a double knot on the back side. Trim the ends about 1/4 inch from the knot. Melt the ends to connect them and prevent unraveling.
- Tape the bracelet to your work surface with the tie strings up and the 7 inch strings down.
- Organize the strands by color and braid as far as you can go.
- Repeat step 2 at the other end.
HOW TO MAKE WAX STRING BRACELETS WITH CONNECTING CHARMS
Another fun variation is to add a charm to the middle of the bracelet as a focal point.→Wax String Bracelet with Connecting Charms Video←
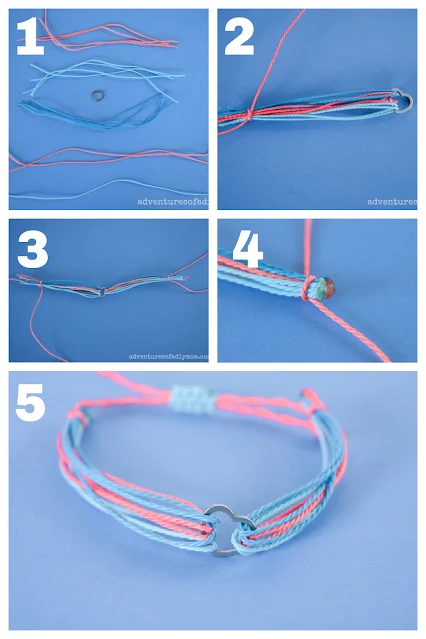
- Cut 12 strings 6 inches long. Cut 3 strings 9 inches long.
- Gather 6 of the strands and insert into the charm. Fold the strands in half with the charm in the middle. Tie the end with a 9 inch string. Turn and double knot on the back side.
- Repeat step for the other half of the bracelet.
- Trim and melt the ends.
- Twist the ends and add an adjustable sliding knot closure. (Refer to previous instructions for this part.)
HOW TO MAKE WAX CORD BRACELETS WITH WORDS
Using letter beads to add words or phrases to the bracelet is a great way to customize your bracelet. Show your school spirit, use motivational words or phrases, or personalize the bracelet with a someone's name.→Wax Cord Bracelet with Words Video←
Note: My kids high school mascot is a Don, (a Spanish nobleman). It's definitely unique. That is why I chose the phrase Go Dons.
- Cut 8 strings 6 inches long. Cut 1 string 7 inches long. Cut 3 strings 9 inches long.
- Insert the letter beads onto the 7 inch string. Center the beads and tie a knot on each side as close to the beads as you can get it.
- Gather all the 6 inch strings and the string with the beads. Tie a 9 inch strand around the end. Turn and tie a double knot on the back side.
- Tie the other end of the strings the same as in step 3. Trim and melt the ends.
- Twist the ends and make a sliding knot closure. (Refer to previous instructions.)
FREE PRINTABLE INSTRUCTIONS FOR WAX CORD BRACELETS
This is a great resource to print off and take if you are doing a group activity.Click here for printable instructions. Or click the image.
 |
| Printable Instructions for Wax Cord Bracelets |
MORE DIY BRACELET IDEAS
- Yarn Friendship Bracelets
- Clear Tube Seed Bead Bracelets
- Braided Leather Stacked Bracelets
- Kumihimo Beaded Bracelets
- Kumihimo Braided Bracelets
- How to Make Charm Bracelets
Find more crafts ideas here.
Don't forget to pin it!!


.jpg)


0 comments